How to install and test WordPress on a local server
Set up a free local server on your PC or Mac so you can run a new WordPress site without your work being visible to the world.


The free WordPress blog tool has grown over the years into a fully-fledged content management system, greatly simplifying the process of building a smart, extensible database-driven site. Unless you're happy with your potential audience clicking through your unfinished pages, though, you should avoid working on the initial development of your site while it's hosted on a live server.
Fortunately it's simple (and free) to set up a local server on your PC or Mac using Wamp or Mamp. Here we'll walk you through the steps involved in doing this on each platform, so that you can develop in private and launch your new online presence only when you're good and ready.
Install the local server
1. Windows users need to download the server software from wampserver.com/en/download.php, choosing the 32-bit or 64-bit version as appropriate. Mac users should head to mamp.info. Wamp installs on the PC at c:\wamp, while Mamp installs in the Mac's Applications folder. The setup process is a little less involved on the Mac, as PC users will need to specify their default browser as part of the process. If this is Internet Explorer then you just need to click Open as your Windows folder will already be selected. If it isn't, navigate to the relevant folder and select the browser you want to use.
Windows is naturally cautious about allowing such fundamental changes to the way it works and how people can access its resources, so the firewall will ask you to confirm that you're happy for the Apache HTTP Server to communicate on your home and work network. Leave the checkbox ticked (the default option) and click 'Allow access' to proceed.
You will be asked to supply details of your SMTP server and email address. If you don't know what the server address is, just click Next to complete the installation. If you won't be using the PHP mail() option to send messages from the local server then this won't affect you anyway.
Open a browser and, on a PC, point it to http://localhost/. On a Mac point it instead towards http://localhost:8888/ On either system you should see the local server status screen, but if you get an error message, check that the software is running. On the PC, click the Wamp icon in the System Tray and select Start All Services. On the Mac, launch Mamp from the Applications folder and, if it doesn't automatically start the server services, click the Start Servers button.

Install WordPress
2. Before you can install WordPress on your new local server, you need to create a MySQL database in which it can store your blog content. Click phpMyAdmin on the status page to open the MySQL configuration utility. You shouldn't need to enter a username or password as these will be already in place, but if a popup asks for authorisation, use root for both.
Click in the box below Create new database and choose a database name. It doesn't matter what you pick, but for simplicity choose the same as you're likely to use on your remote server. We have chosen wordpress in this instance. Leave all of the other dropdown menus as they are and click Create to complete the process.

3. You now need to install the core WordPress files. Point your browser at wordpress.org and download the latest build from the link on the homepage. Unzip the files and put them into your Wamp or Mamp web files folder. Under Windows, assuming you chose to install Wamp in the default location, this is c:\wamp\www. If you installed it somewhere else, change what comes before the www to point to that folder.
On the Mac, unzip the WordPress files to ~\Applications\MAMP\htdocs. If asked, confirm that you want to overwrite the index.php file that's already in place as this is just the local server's configuration information page.

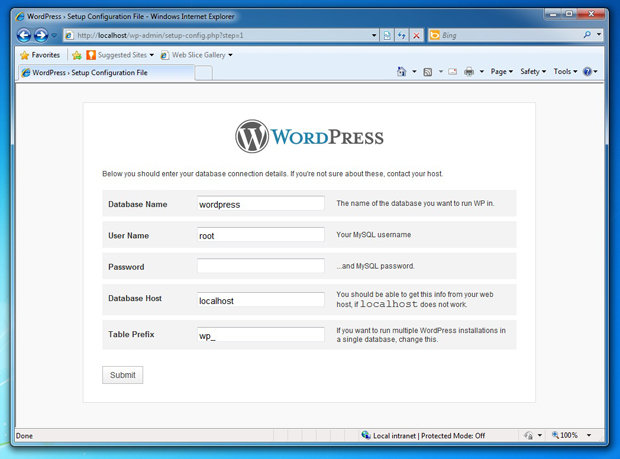
4. Return to your browser and reload http://localhost/ (localhost:8888 on the Mac) to start setting up WordPress. The first thing you'll see is a warning that there's no configuration file in place. Click the Create a Configuration File button, followed by 'Let's go!' and then enter the following details:
Database name: [whatever you specified in step 3]
User name: root
Password: [leave blank on the PC; root on the Mac]
Database Host: localhost
Table Prefix: wp_
5. With your database details in place, click through the next two screens to get started with setting up your WordPress site. Tap in a site title, username and password. Again, you can enter whatever you like here, but we'd advise using the same as you're going to use on your live site as you'll be able to copy across your settings.
Provide an email address to which WordPress can send your login credentials if you ever forget them, and click Install WordPress. WordPress now finishes writing your configuration files and confirms your username. Click Log In to open the WordPress dashboard.

6. Congratulations! You've set up a local installation of WordPress running on your own local server. You can now populate your blog with content and tweak the designs of your templates without having to work on a live site, giving you a grace period before making your work public. You can preview your site by returning to http://localhost/ on the PC and http://localhost:8888/ on a Mac.
Exporting your content
7. When you're happy with your local work, it's time to port it to your live blog. This is a two-stage process. Start by exporting your posts by clicking Tools | Export in the sidebar. WordPress has its own interchange format to ensure a clean and accurate transfer from one installation to another.
Choose whether you want to export all of your content or just your posts or pages and then click Download Export File. Save the resulting XML file somewhere safe. Now log in to your remotely-hosted WordPress installation, pick Tools | Import and click WordPress for the import type.
If you haven't already installed the WordPress importer, you'll be prompted to do so; simply click Install Now in the window that pops up, then browse for your saved file and click Upload file and import.

8. To copy across your locally-designed themes, navigate to your local server templates folder (c:\wamp\www\wp-content\themes\ on the PC; ~\Applications\MAMP\htdocs\wp-content\themes\ on the Mac) and copy the complete theme folder and all of its contents to the same wp-content\themes folder on your server. Finally, log in to your remote installation of WordPress and pick Appearance | Themes from the sidebar and select the theme you have copied across to activate it.

You have now successfully developed a site locally and, when it's ready for public consumption, ported across the content and themes. From here on you can continue adding content to the live site as you only need publish each entry when the content has been checked for accuracy, and use your locally-installed version for developing templates and designs.