Application launching options in OS X
The most common ways for launching applicaitons in OS X are to either double-click them directly in the Finder, or to click those that are in the Dock. Besides these methods there are several alternative ways to access applications, which may be useful depending on various problems or situations you may find yourself in.


The most common ways for launching applicaitons in OS X are to either double-click them directly in the Finder, or to click those that are in the Dock. Besides these methods there are several alternative ways to access applications, which may be useful depending on various problems or situations you may find yourself in.
Granted if there are problems such as your mouse being frozen, or the menu bar not responding, you might wish to tackle it first through workarounds such as screen sharing to your system from another computer and restarting it; however, knowing the various ways to launch applications is useful to have, if not fun to try. Keep in mind these are just some approaches, and there may be others out there (including many third-party applications such as QuickSilver) that you can explore.
1. Spotlight

The spotlight feature in OS X can be used as an application launcher, and is quite convenient to access by just pressing command-spacebar. Entering application names will start a search that should quickly narrow down to the desired application, and pressing enter will launch the application.
You can use the "Spotlight" system preferences to rearrange the display order of items, so you can use it to quickly launch other items such as previously accessed websites that are stored in your browser's history, just by entering part or all of the URL.
The problem with Spotlight is that it may pause while items are being searched. Additionally, not everyone has it enabled, or fully enabled to include items like applications and browser contents. Nevertheless, it is exceptionally useful and I've defaulted to it as my primary launcher utility.
2. Stacks

If you want your applications right at your fingertips you can drag the Applications folder to the Dock and set it to be viewed as a list (view and behavior options are available by right-clicking the folder in the Dock), allowing you to quickly see all of your applications (including subfolders like "Utilities") in a list.
For windows switchers this is quite analogous to the "Start" menu, so might be a bit welcoming to set up. In fact, some virtualization solutions like Parallels Desktop will create application a stack for virtual machine applications, since it behaves so much like the Start menu.
3. Terminal
Getting more into the technical side of things, you can also use the Terminal to launch most applications in OS X. Applications are actually bundles that consist of the binary application and support files and resources the application needs to run. To see this content, just right-click the application and choose "Show Package Contents" and you can browse through the resources.
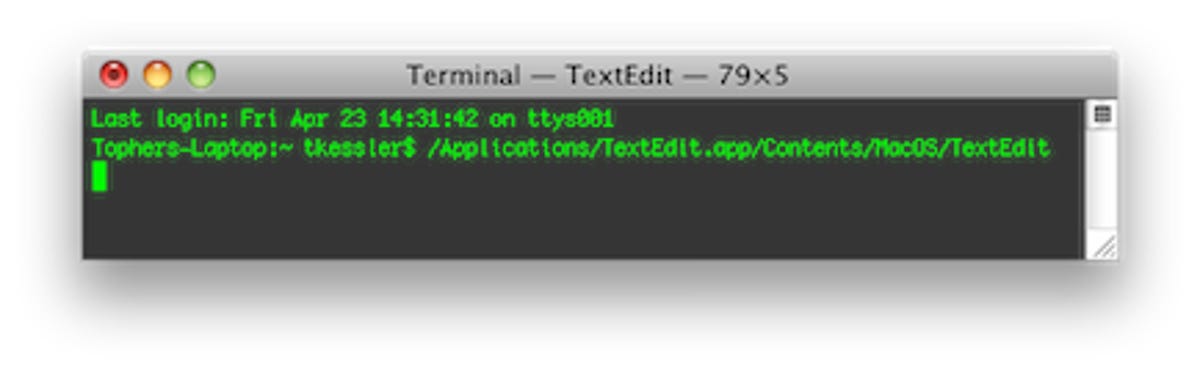
To open an appliation with the terminal, just target the binary file for it in a single line. For instance, to launch TextEdit you would enter the following command:
/Applications/TextEdit.app/Contents/MacOS/TextEdit
NOTE: The Terminal is case-sensitive and any spaces in file or folder names should be preceeded with a backslash (\), or the individual file or folder names should be enclosed in quotes.
Keep in mind that if you open an application with the terminal in this fashion, you will both open a "new instance" of the application as well as keep the new instance in the foreground of the current command shell. This means that the terminal window will need to stay open while the process is running since if you close the terminal window (and confirm closing of the active processes in doing so) you will also close the newly created application instance.
You can send the new application instance to the background so the current shell will not be the parent process of it and therefore be able to close the terminal window, by putting an ampersand character after the command to open the application, such as the following command:
/Applications/TextEdit.app/Contents/MacOS/TextEdit &
While using the Terminal may seem like a cumbersome approach to launching applications, it can be used to launch applications with custom conditions, such as running with administrator privileges. When used in conjunction with the "sudo" command, you can allow TextEdit to modify otherwise restricted or hidden system files (only do this if you know what you are doing):
sudo /Applications/TextEdit.app/Contents/MacOS/TextEdit /PATH/TO/HIDDEN/FILE &
Keep in mind that while you can do this with TextEdit, you can use other applications that support authentication, i.e., TextWrangler, to access and modify hidden or restricted documents more easily.
4. The open command
As part of the collection of terminal commands in OS X, Apple includes a command "open" that can be used to launch applications, or open documents and URLs in the application assigned to them by LaunchServices.
To do this, with the Terminal open enter "open -a APPLICATION" to launch any application by name (use quotes around "APPLICATON" if there are spaces in the name), or just use "open TARGET" to open the target (i.e., documents, or URLs) in the assigned application.
While this command works, it is a bit inconvenient since it requires you to use the Terminal and then enter the command with the appropriate flags. For instance, you would need to enter the following to open Activity Monitor:
open -a "Activity Monitor"
4-1. Creating a Windows "Run" alternative

While the use of the "open" command by itself may be a bit inconvenient, you can use it in conjunction with Automator to create a workflow application that similar to the "Run" command can be used to launch URLs and applications directly, which may be helpful to people switching from Windows who are used to this feature.
To do this, create an automator workflow with the following modules:
Ask for Text -- set the question to "Run:"
Run Shell Script -- change "pass input:" to "as arguments" and replace the command text with the following code:
if [[ "$1" = *://* ]]; then
	open "$1"
else
	open -a "$1"
fi
With the workflow set up, choose "Save As" from the "File" menu and save the workflow as an application named "Run" or something familiar, in a desired location. Then add it to your dock, or drag it to a Finder window toolbar for easy access, and when you launch it you should be able to launch applications or URLs by just entering them in the text field.

Questions? Comments? Post them below or email us!
Be sure to check us out on Twitter and the CNET Mac forums.