50 iOS 6 tips: Panorama, Apple Maps, reading list and more
Apple's latest operating system for iPad, iPhone and the iPod touch is its smartest yet. Here's our top 50 tips to get the most from it.


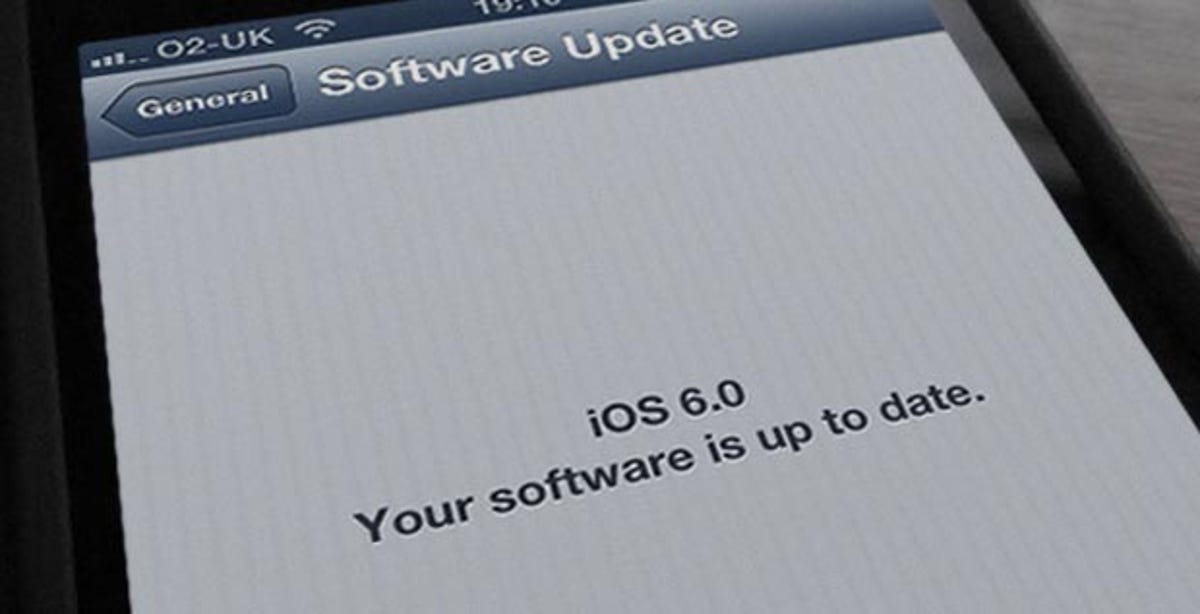
After a year-long gestation, iOS 6 is upon us. The latest version of Apple's operating system for iPad, iPhone and the iPod touch is smarter than ever, with slicker graphics, better iCloud integration and easier sharing. It ships on the iPhone 5, and is compatible with the iPhone 3GS, 4 and 4S, fourth and fifth-generation iPod touch, and the second and third-generation iPad.
Here's CNET UK's pick of the 50 best tips, changes and must-have features for iDevice users everywhere.
The iPhone, iPad and iPod touch have long shared one of the best mobile email clients currently available. In iOS 6 it's been given a subtle dab of polish.
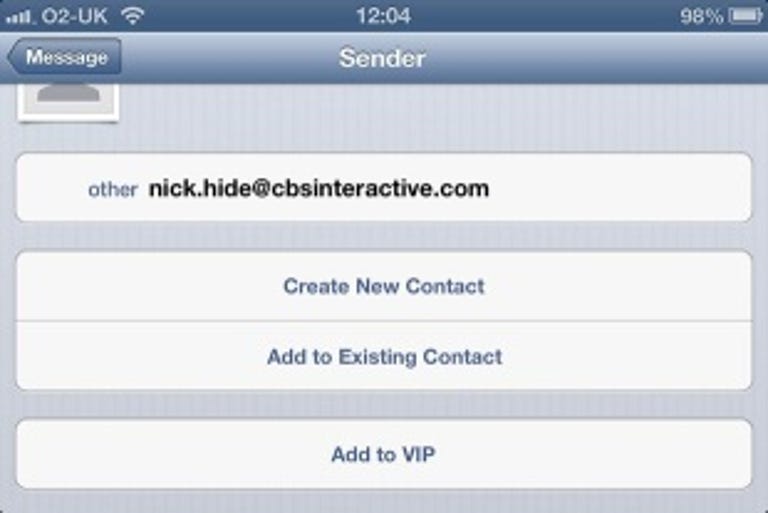
1. VIP senders
Some emails are more important than others. Sometimes it's the subject that determines their importance, but more often than not it's the sender. Add really important senders to your VIP list and their messages will be sorted into a dedicated VIP inbox, so if you're pushed for time you can just read them and ignore everything in your regular inbox. Think of it as Apple's take on Google's Priority Inbox feature for Gmail.
To save a sender as a VIP, open one of their messages, tap their name in the From field and then tap Add to VIP. A small star will appear beside their address to indicate that it's been added to the list.

The circular arrow email refresh button has disappeared from the mail app's interface.
To update your inbox in iOS 6, simply drag it down past the top of the message listing, as you would to update your Twitter stream, and release when the stretched icon snaps.
Sharing
iOS 6 benefits from beefed-up sharing tools for all of the core apps.
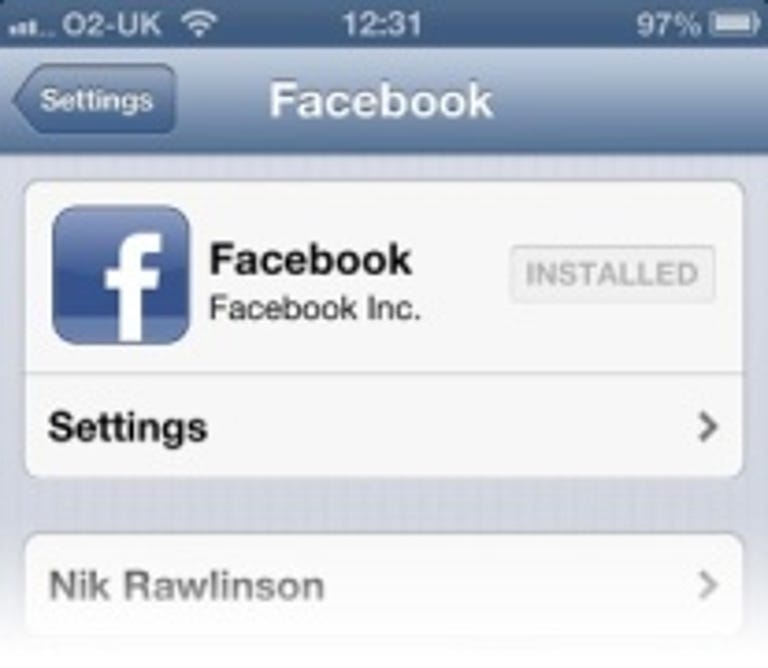
3. Facebook integration
iOS 5 introduced Twitter as a core service. iOS 6 extends that honour to Facebook, which was rumoured to have been Apple's first choice when developing iOS 5, and was for some reason switched out late in development.
Facebook and Twitter are both managed through the Settings App. Scroll to the end of the default applications settings to find them and add your details in the appropriate boxes to enable posting to either service without using a third-party app.
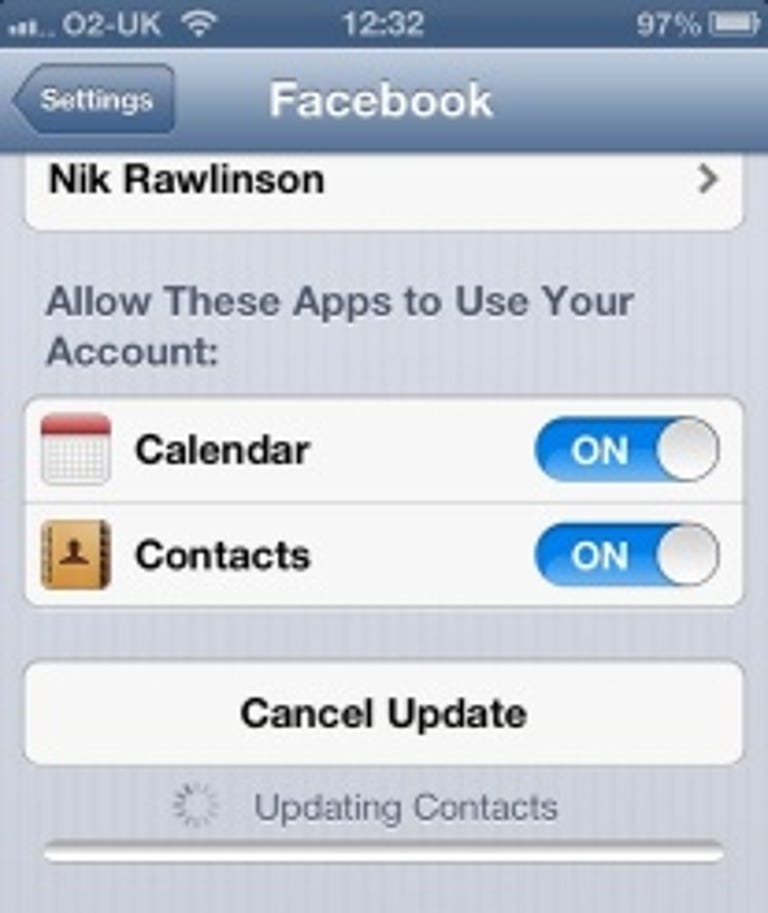
Give Facebook access to your Contacts list and it will match up anyone listed on your phone who is also a friend on Facebook.
Not only will this enable you to post updates to them directly, but it'll also draw down their Facebook photo and use it to populate the photo field for their record in the Contacts app.
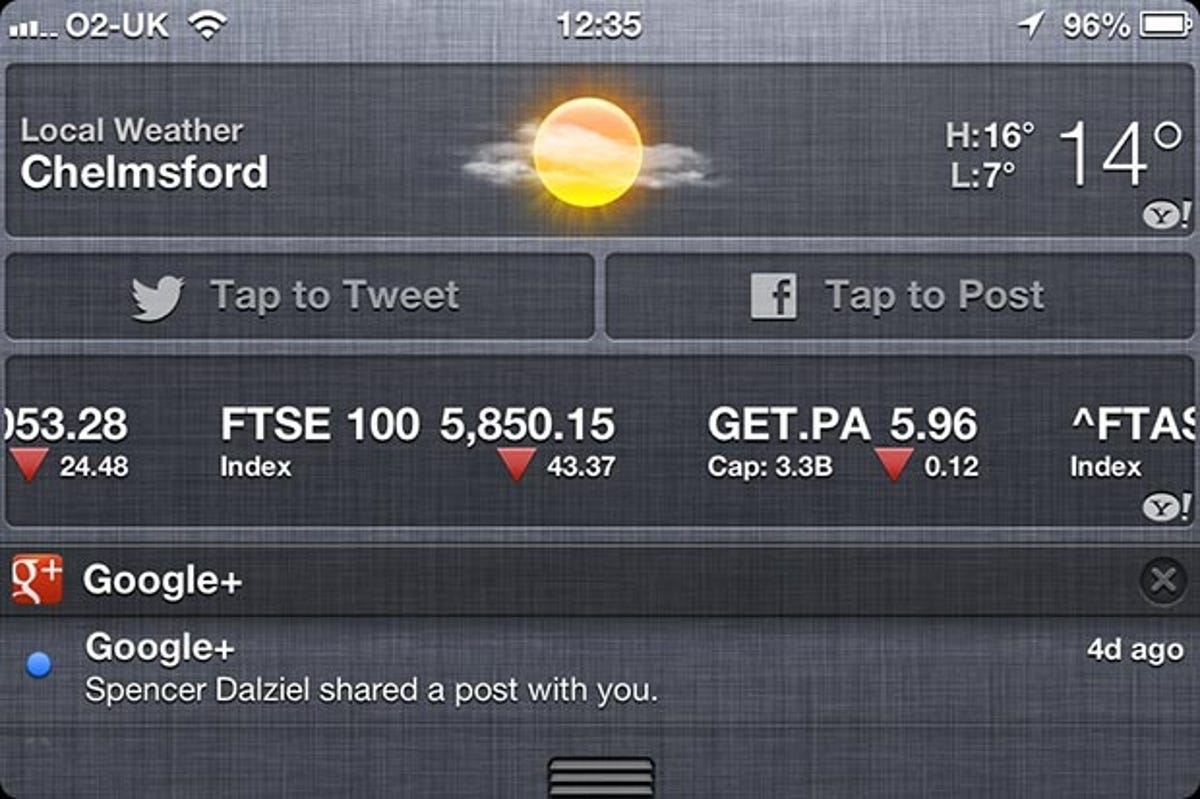
5. Post from Notification Center
As Facebook and Twitter are built in, you no longer need to use bespoke apps to post to either of them. So, if inspiration hits when you're sitting on the bus, whichever app you're using, you can swipe a finger or thumb down from the top of the screen to open Notification Center and use the Tap to Tweet and Tap to Post boxes to send an update directly.
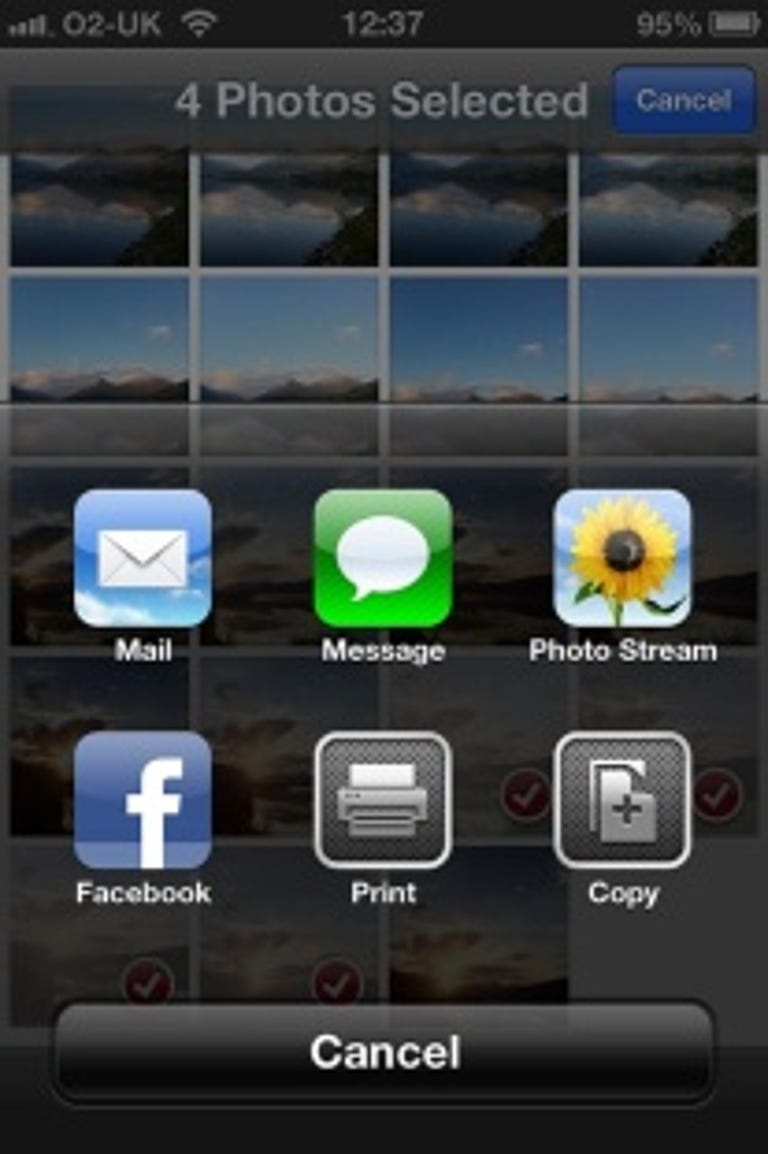
Previously it was only possible to email photos one at a time, unless you went through the tedious process of copying and pasting them individually out of the Photos app and into your message. With iOS 6, you can select up to five photos at once and send them all out in a single email.
Open the Photos app, tap edit and then tap on each of the photos you want to send. Now tap Share to call up the various ways in which you can dispatch them and tap Mail to drop them into a new message.
Note that the sharing sheet is content sensitive, so if you select more than five images, the Mail option disappears. Reduce the selection to just one image and the Twitter option, which is missing from the grab to the right, reappears.
7. Shared Photo Streams
Photo Stream already makes it easy for you to view images shot on your iPhone from your iPad. Now Shared Photo Streams goes some way to restoring the Gallery feature that disappeared when Apple shut down MobileMe in favour of iCloud.
Create a Shared Photo Stream by opening Photos, tapping Edit and then tapping on each of the images you want to include. Now tap Share and select Photo Stream. Give the new Stream a name, include an address for the person with whom you want to share it, and decide whether or not you want the website on which they're stored to be made public. The person to whom you sent it will receive an email containing a link to your shared photos.
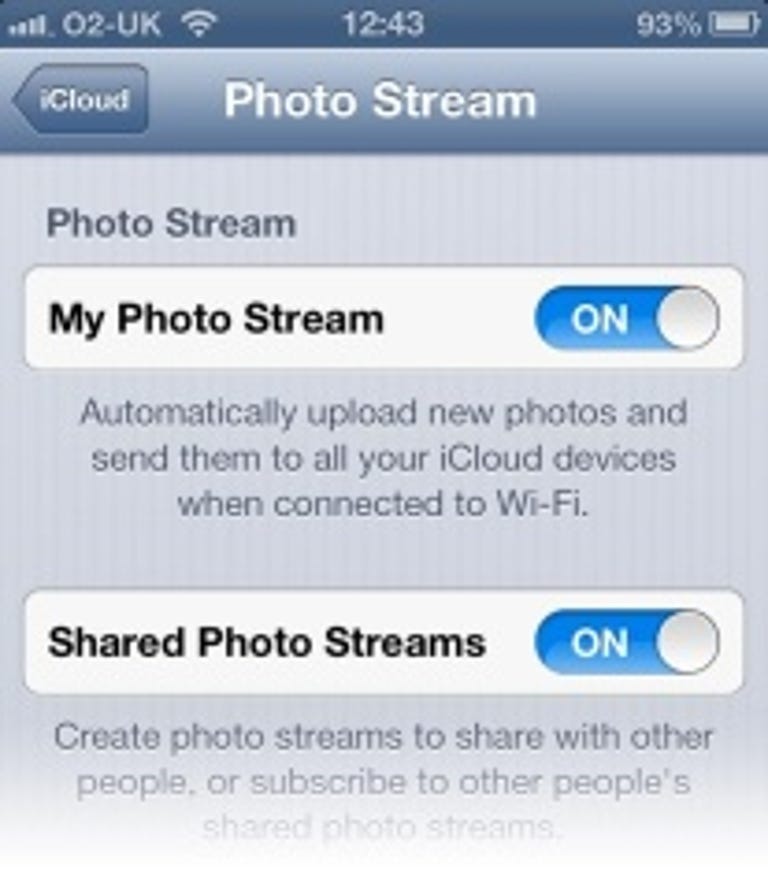
Shared Photo Streams are turned off by default, so before you use them for the first time, you'll need to turn them on through Settings > iCloud > Photo Stream > Shared Photo Streams.
Privacy
iOS 6 takes your privacy seriously, and although there are plenty of opportunities for you to integrate your data with third-party applications, such as allowing Facebook to peep at your contacts, it's easy to shut down those that shouldn't be seeing everything.
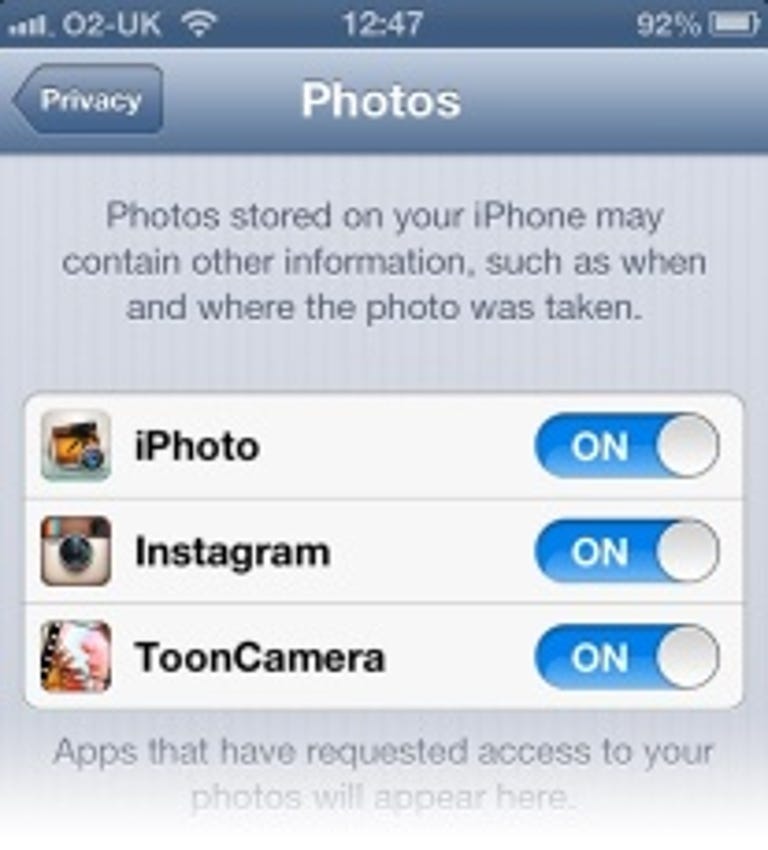
The centralised options pane at Settings > Privacy lets you restrict particular data types, with lists of which applications have requested certain types of data.
Each one is accompanied by a slider allowing you to revoke its access with a single tap.
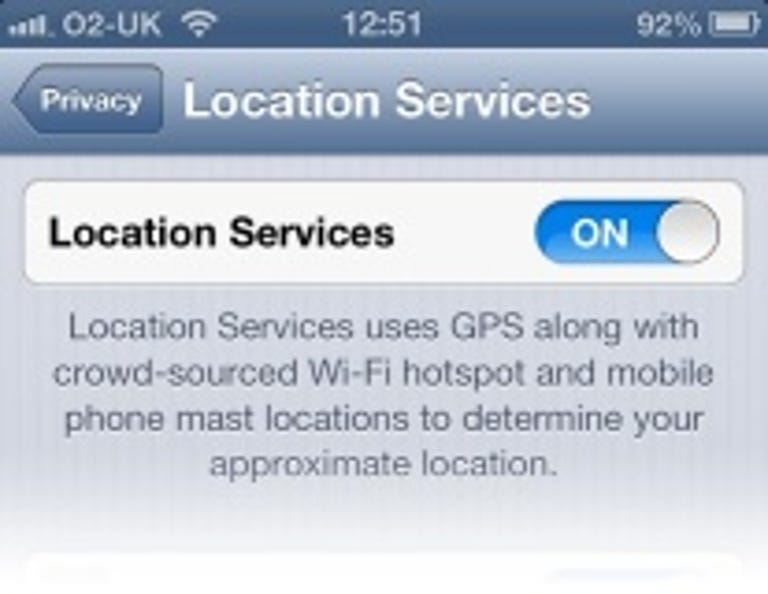
The iOS Location Services layer provides data based on your current position so that applications like Maps can plot your location. It also means the camera can geolocate your images so that when you import them into an application like Adobe Photoshop Lightroom or a sharing site like Flickr, it's easy to see where they were taken.
Again, you can revoke access to this data for each app in turn, but because it's potentially sensitive, you can also switch it off system-wide by opening Settings > Privacy > Location Services and tapping the slider at the top of the screen to move it to OFF.
It's not just when you're in the library that you might want to quieten down your phone. That's why Apple implemented Do Not Disturb.
One tap on this option in the Settings app and your iPhone falls silent until you disable it.
In case you should forget, it places a moon icon beside the clock to remind you that it's set not to disturb you.
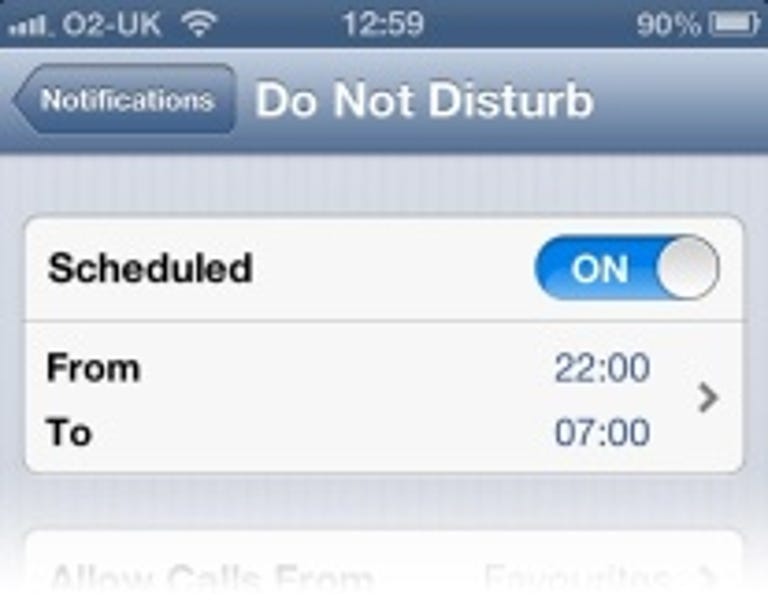
You can set Do Not Disturb to activate automatically during set hours. That's good news if you sleep with your phone beside your bed (don't forget to set the hours to expire before any alarms you've set to wake you up), and for anyone who doesn't want to be disturbed while working (teachers stood at the front of a classroom, for example).
Set the hours during which Do Not Disturb should kick in by tapping Settings > Notifications > Do Not Disturb > Scheduled.
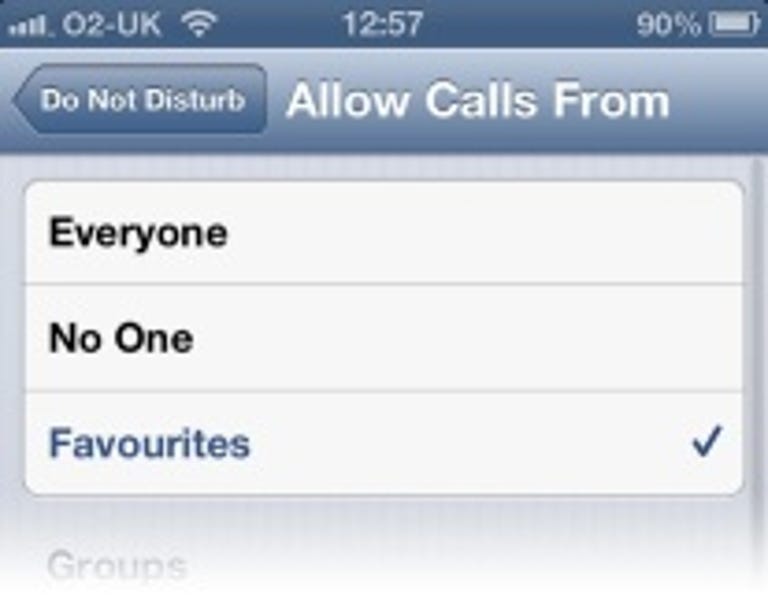
It's all very good being able to take yourself out of circulation like this, but what if you're a parent with a kid who's had an accident or is locked out of the house? In this instance you should set some exceptions to let through calls from those who matter most.
Set up a new list in Contacts and add to it those who should be excused from calling you when your phone is set to Do Not Disturb, then go to Settings > Notifications > Do Not Disturb > Allow Calls From and select your new list.
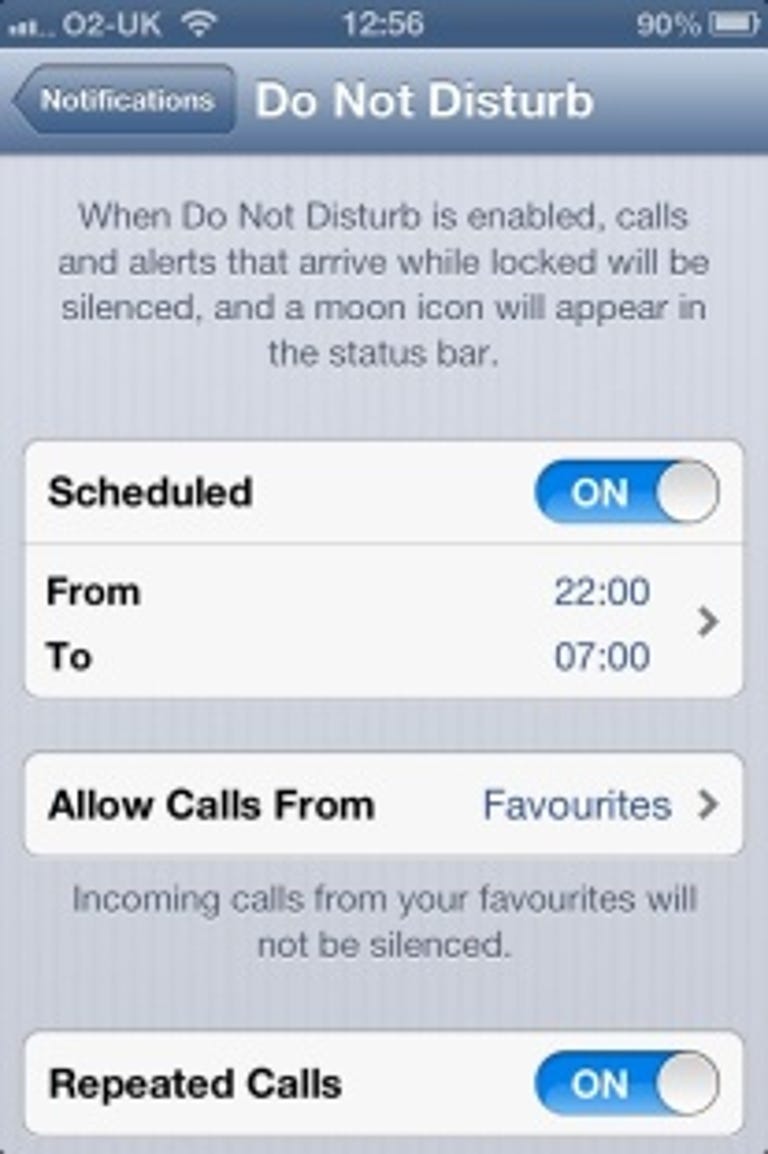
Anyone else who needs to get through in an emergency will likely try your phone several times in quick succession.
If they call again within three minutes of their first call they'll cause your phone to ring if you set the Repeated Calls slider to ON.
Browsing
Safari for Windows missed out on an update the last time Apple shipped a new release. On the Mac and iOS though, it's stronger than ever.
15. Full screen on iPhone
The iPhone has always been a great device for browsing the web, in large part because of its high resolution. In iOS 6 you can make it even better with a single tap: turn your iPhone to landscape orientation and tap the double-ended arrow on the toolbar to remove the bar and address box, and enjoy your sites full screen.
16. Reading list
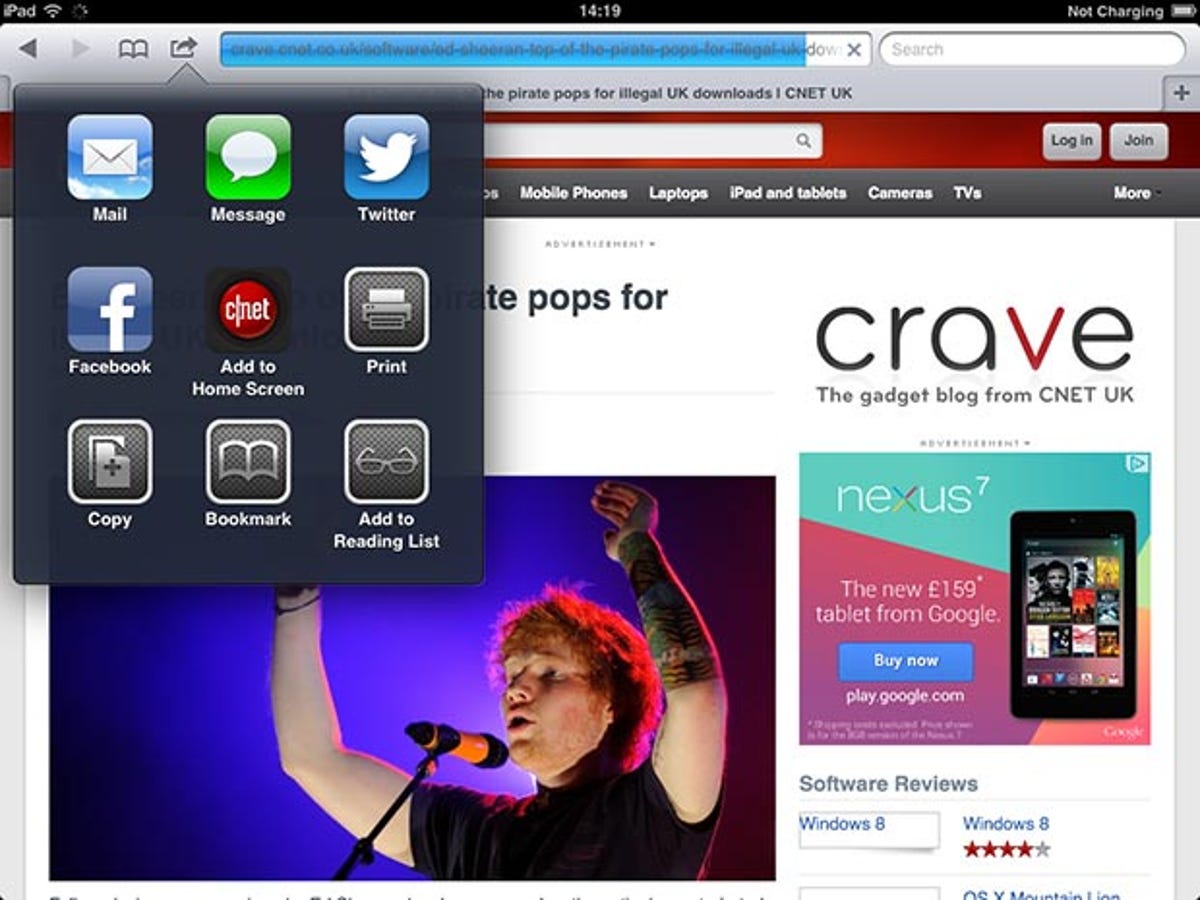
Sometimes you don't have time to read everything you find in one sitting, and you end up with a screen full of tabs. Rather than leaving them open, save each one to your reading list by tapping the shortcut button and selecting Add to Reading List.
Not only will this bookmark the page in your List, which you can find by tapping the open book icon followed by the pair of glasses at the bottom of the drop-down dialogue, but it also caches the page content so you can read it offline. It synchronises it with Safari running on your Mac and other iOS devices so it's accessible from anywhere.
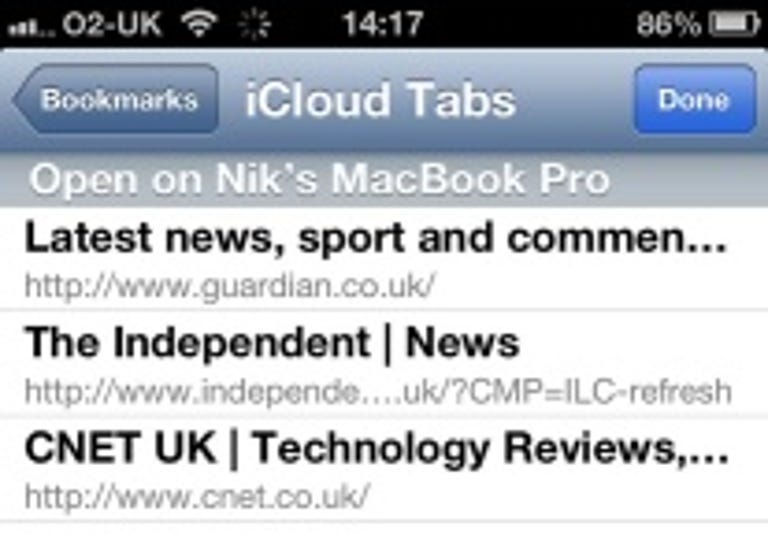
iCloud can also synchronise your browser tabs if you turn on the Safari sync feature through Settings > iCloud > Safari. Once active, it populates an iCloud tab dialogue in the iOS 6 and OS X 10.8 versions of Safari on each of your devices, so you can quickly switch between the same set of tabs on each platform. You can tell on which device each page is opened as they're organised into logical groups, with the device name as the header of each group.
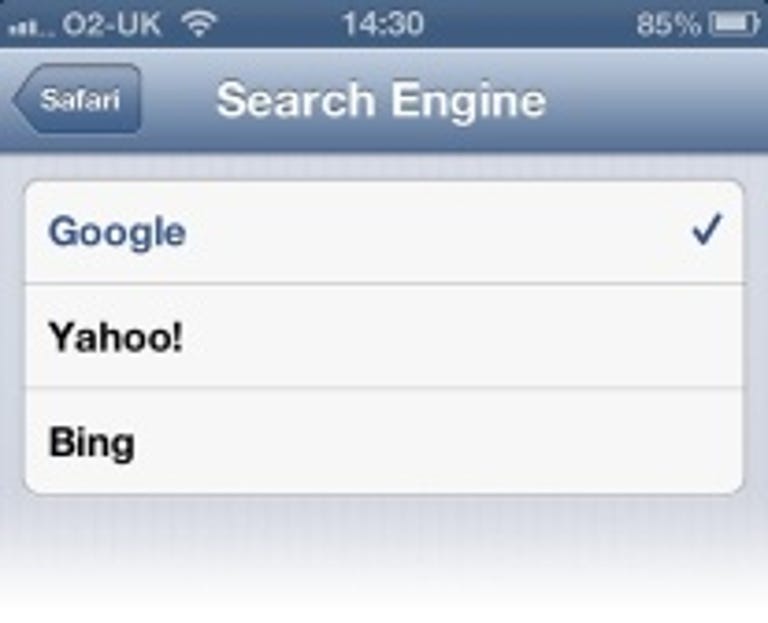
This was possible in iOS 5, but it's worth remembering that you can switch the default search engine.
In its virgin state, Safari always directs you to Google, but you can change this to Yahoo or Bing if you prefer by picking one from Settings > Safari > Search Engine.
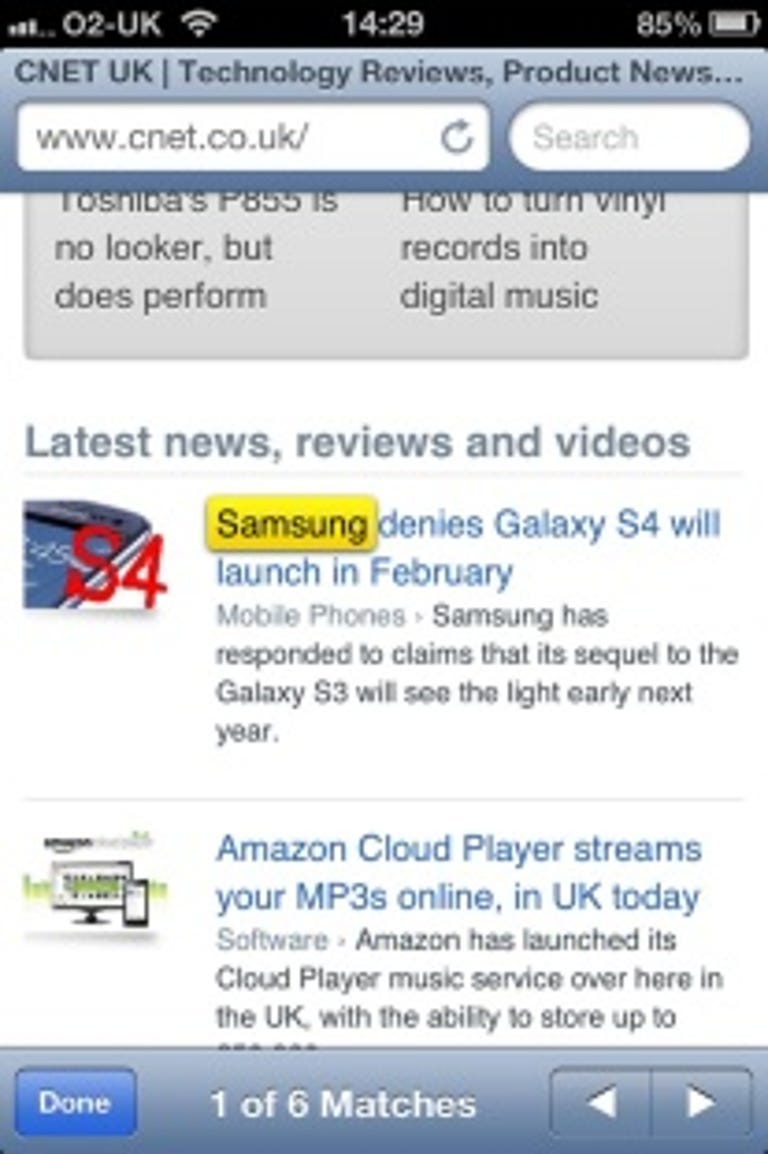
You can also search the current page from the same search box as you would use for Google, Yahoo or Bing.
Type in your keyword (in the grab, right, I've used Samsung), and then scroll to the bottom of the results list to the line where it says how many times it's been found in the current page.
Tap this line and you'll return to the page, with each result highlighted. Use the left and right arrow keys on the toolbar to step backwards and forwards through the list of results.
iPad Clock
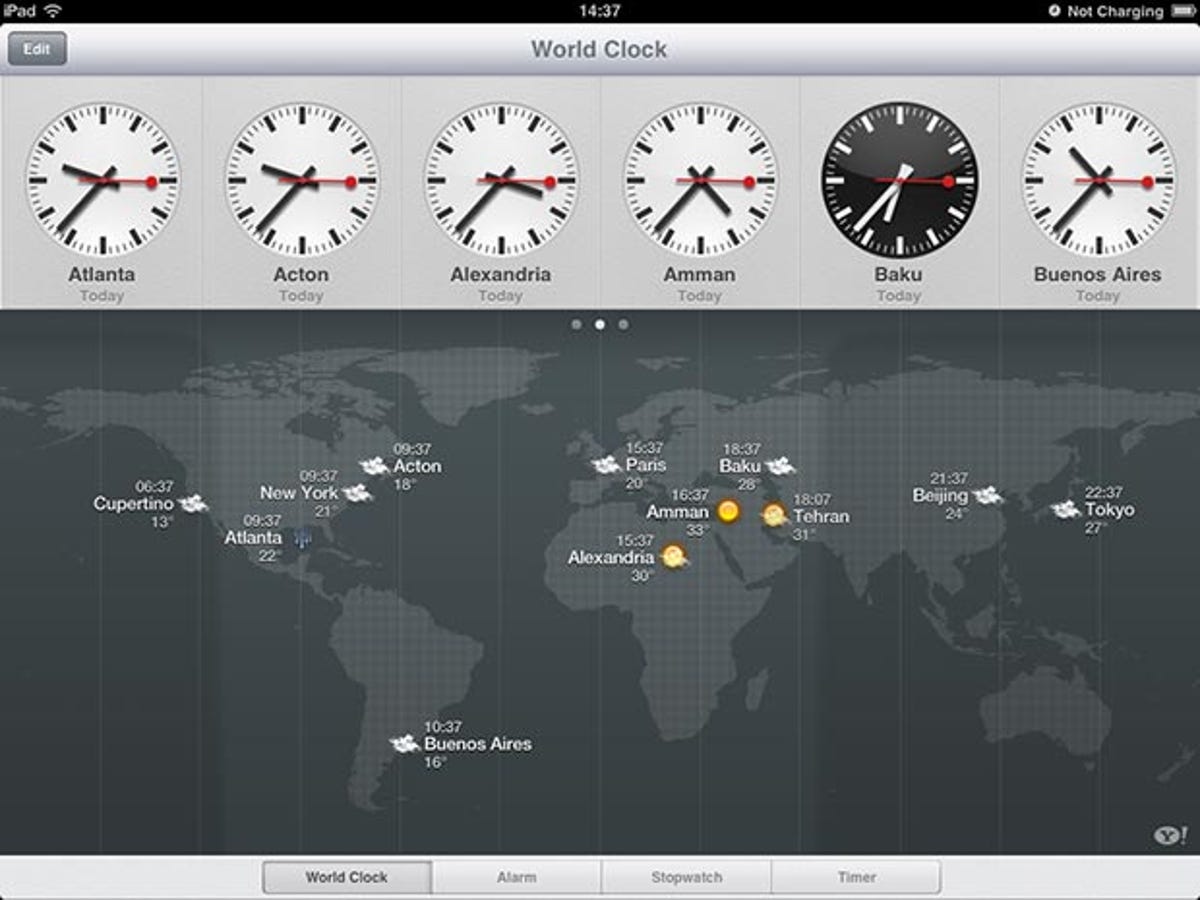
The new iPad clock in iOS 6 has a beautiful set of Swiss faces at the top and a world map below plotting the locations of your chosen cities.
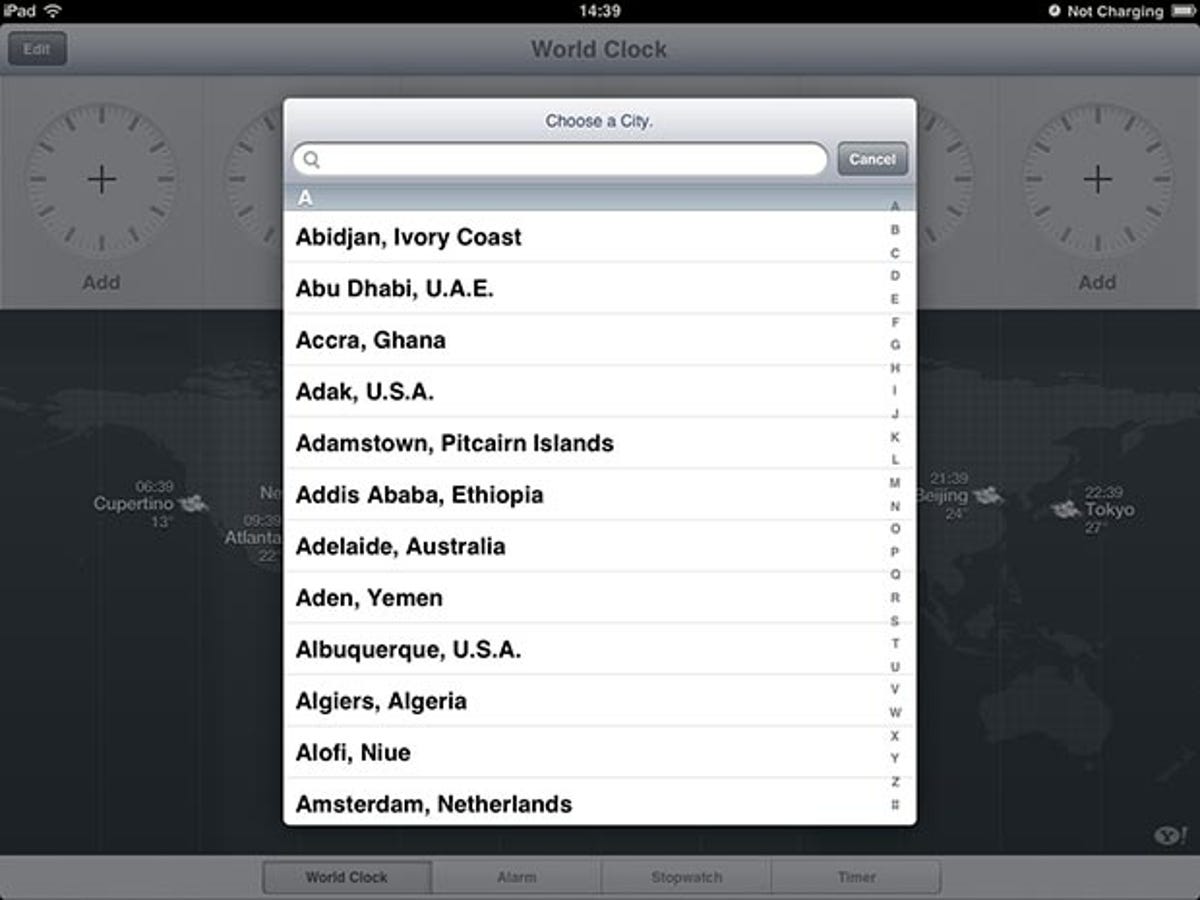
20. Add new cities
You can add your own destinations by swiping the faces to the left and tapping an empty face on the next screen to pick a new city. As you do, cities already on the map will shuffle around to make space for the new one.
When you fill up a whole screen of faces, a new one will become available in the same way that you can have several different screens full of apps. Whichever run of clocks you're looking at, the map will always display every destination you've selected.
21. Check the weather worldwide
The iPad doesn't have a weather app, but if you just want a quick idea of what's happening around the world, you can do so with the clock. Each icon on the map is accompanied by an icon showing current conditions, along with the temperature.
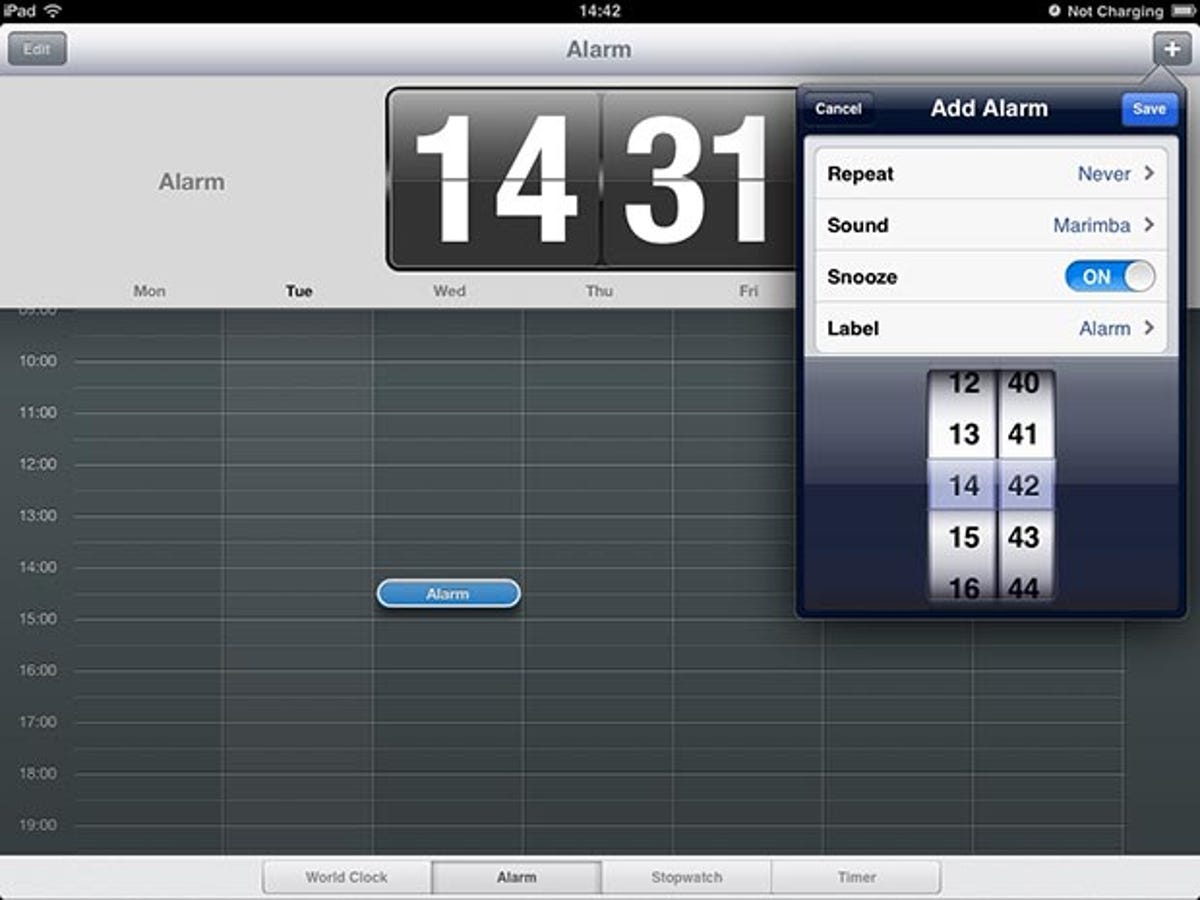
22. Tap to set an alarm
The clock also allows you to set an alarm, as it does on the iPhone. Tap Alarm at the bottom of the screen and the '+' icon at the top to open the alarm tumblers. Rather than scrolling through them until you reach the time you're after though, it's quicker to double-tap on the grid in the time slot where you want the alarm to sound.
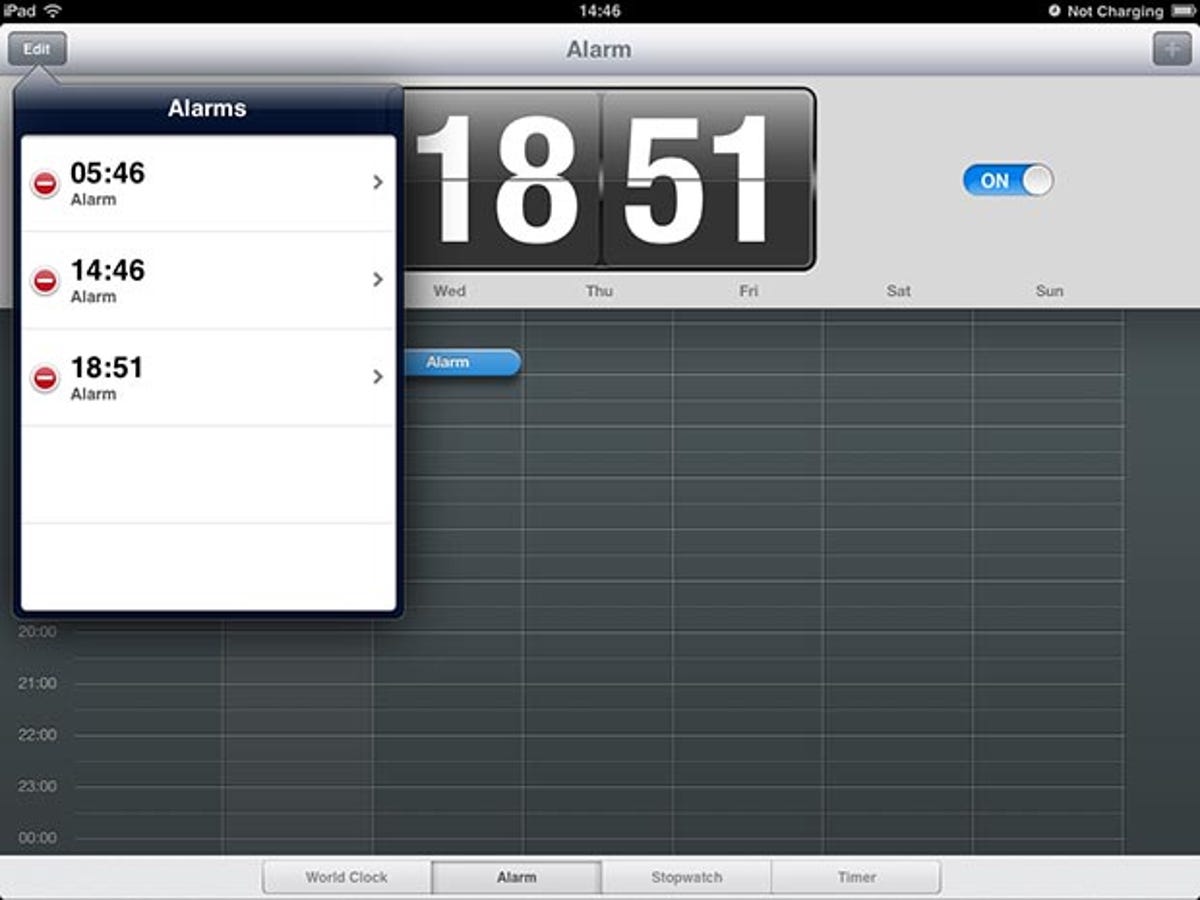
23. Drag to reschedule
Rescheduling works in just the same way. Hold a finger on one of the alarm blobs and drag it up and down to set it later or earlier. Anything set later than the current time will be left in the column for today. Anything set earlier than the current time will be moved into that time slot for tomorrow, since you've already missed it today.

24. Cancel an alarm
To cancel an alarm, tap Edit, followed by the delete icon beside each one in the list that drops down.
Find a lost iDevice
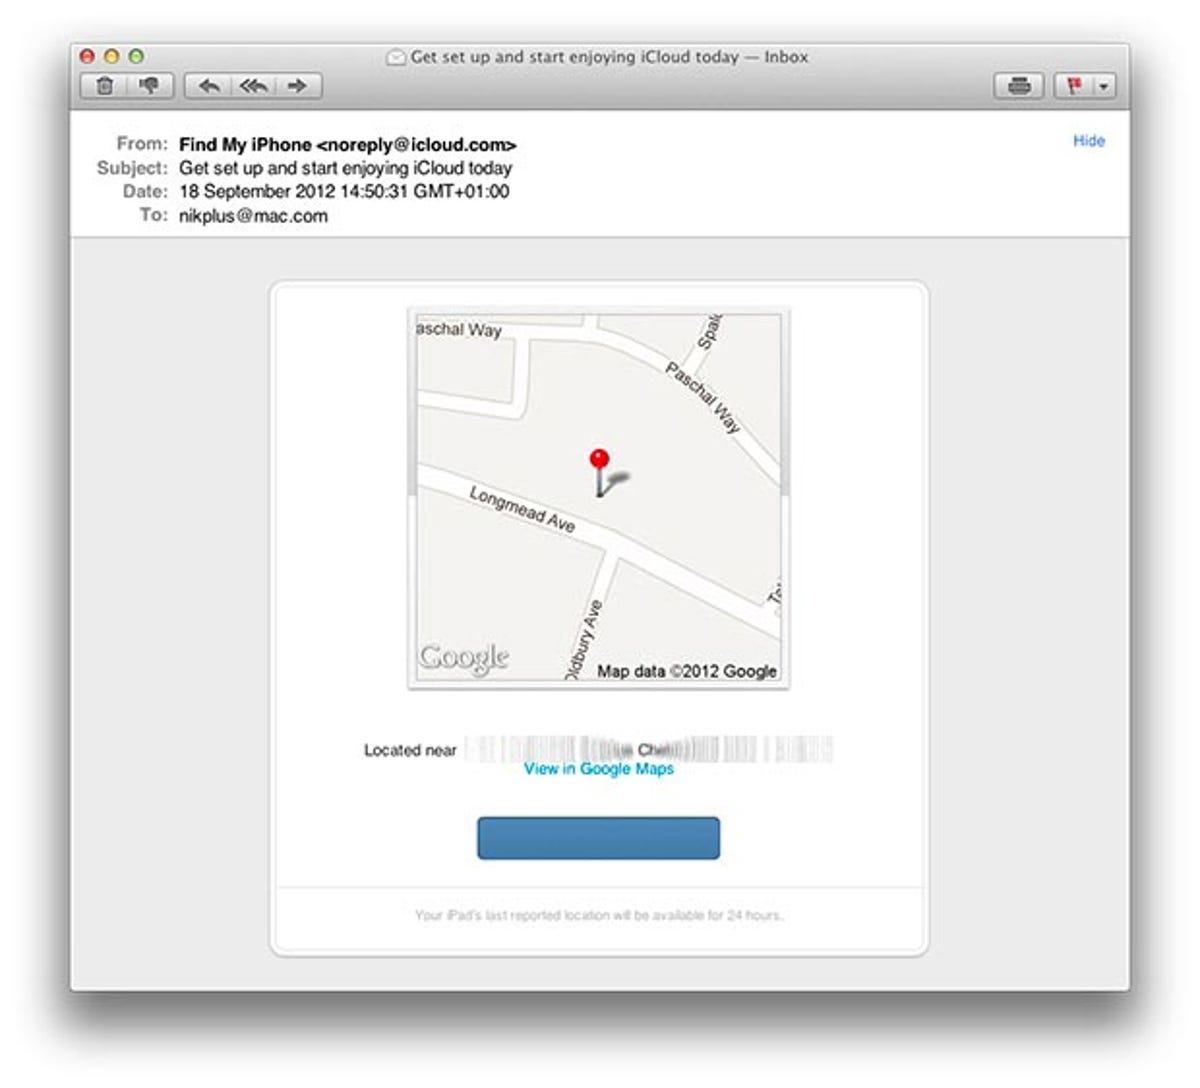
Apple has built on the success of Find my iPhone with a dedicated Lost Mode in iOS 6.
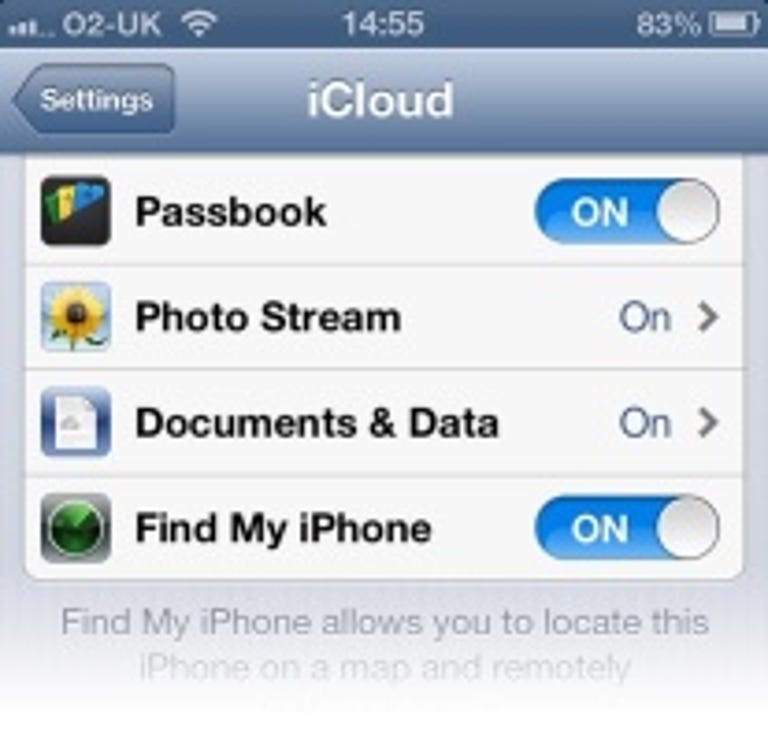
To use the new Lost Mode you need to make sure that Find my iPhone (or Find my iPad) is active on your device. Turn it on through Settings > iCloud > Find my iPhone, then return to the Home screen.
Note that switching this on could result in data about your current location passing through Apple's servers.
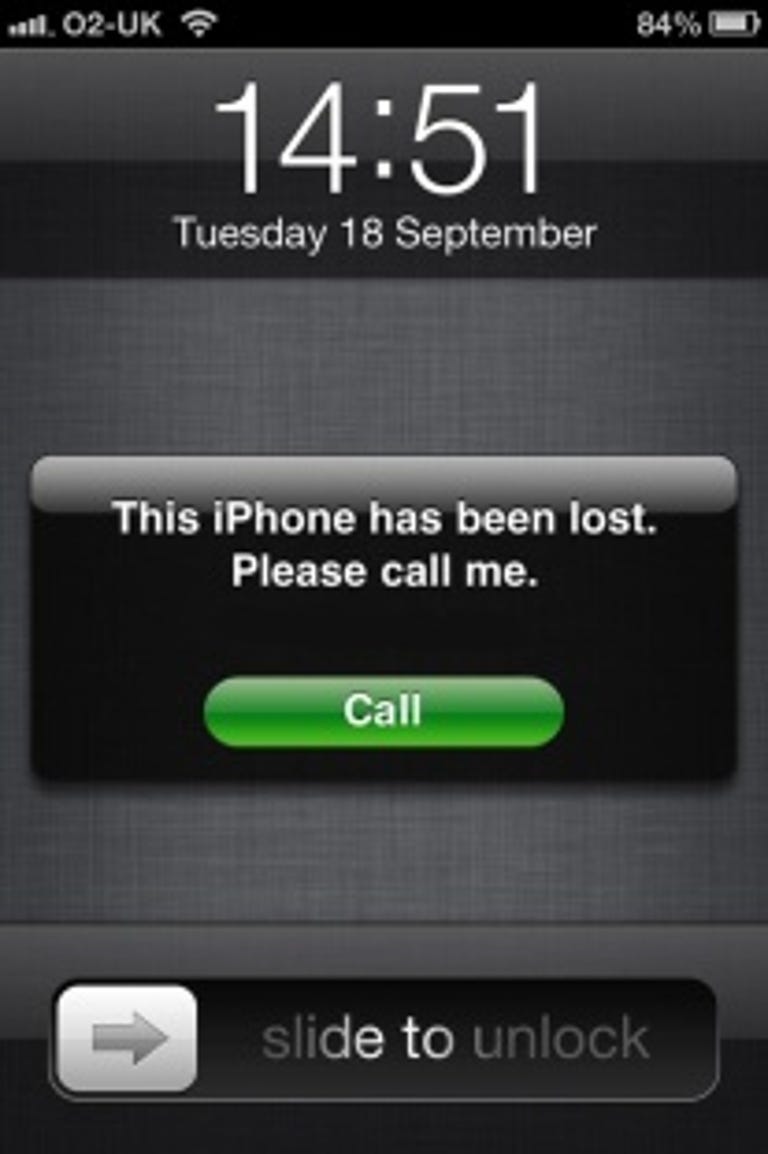
If you lose your iPhone or iPad, log in to icloud.com/find and switch to Find my iPhone. This searches for your device, and if it has an active network or phone connection, it will plot it on a map so you can see where it is. You can now wipe it or put it into Lost Mode.
Lost Mode lets you set a passcode on the device and display a phone number on the screen asking the finder (or thief) to call you. They can do this directly by tapping Call from the screen that pops up on the iPhone, without having access to any of its other features.
27. Check your email
When your iPhone or iPad are in Lost Mode, keep an eye on your email as it will keep on sending you updates of its current location, which should make it easier to find. Don't take any risks and try to recover a stolen device yourself. Pass details of its location to the police or relevant authorities.
A smarter shopping experience
Apple is not just about the hardware and software of its devices, it also offers well-stocked stores for buying goodies to play on them. In iOS 6, each has been given a lick of paint.
28. Improvements to iTunes
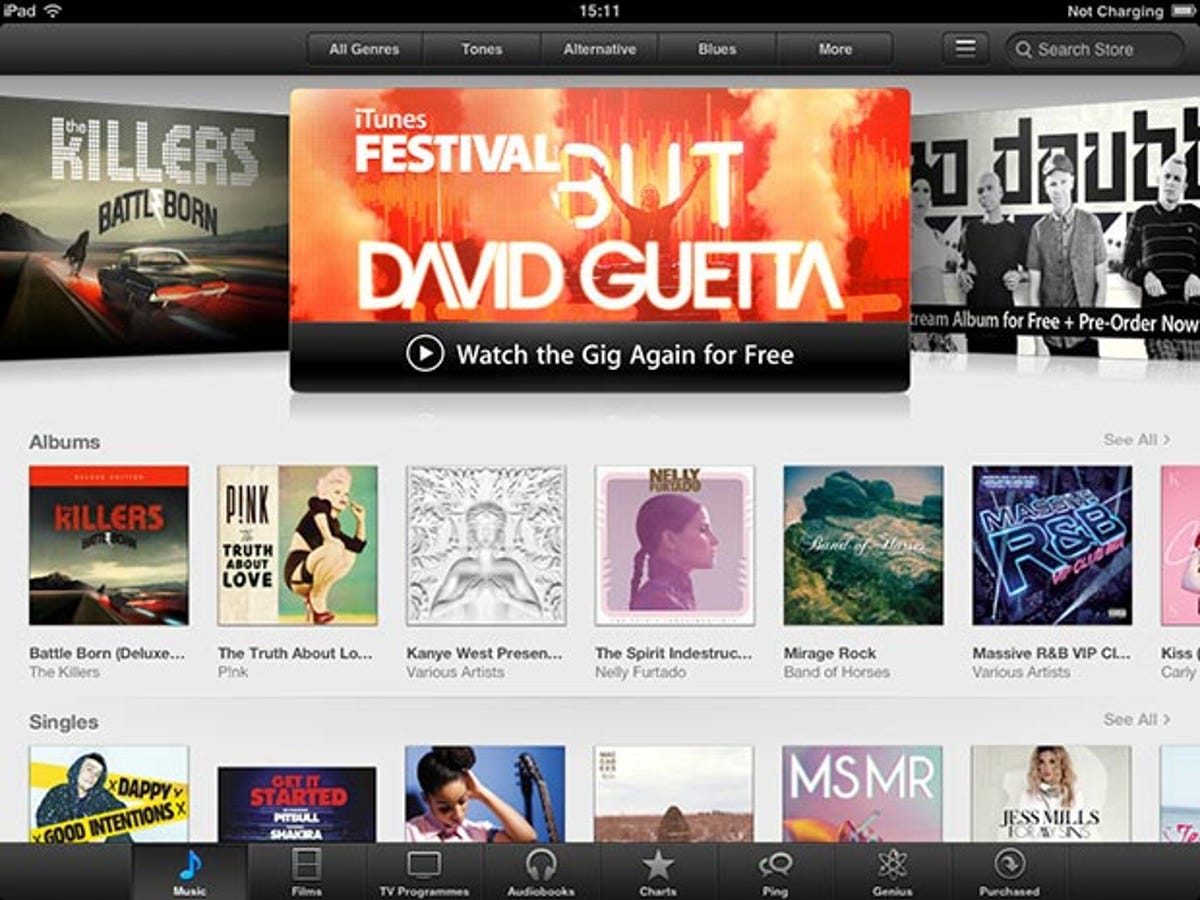
iTunes is only used for buying music, movies, audiobooks and TV programmes in iOS, not playing them back as with the Mac and PC. The old rigid box-based look of this longest-running of all Apple stores has a fresh new look, with a coverflow-style carousel at the top of the page promoting Apple's chosen products.
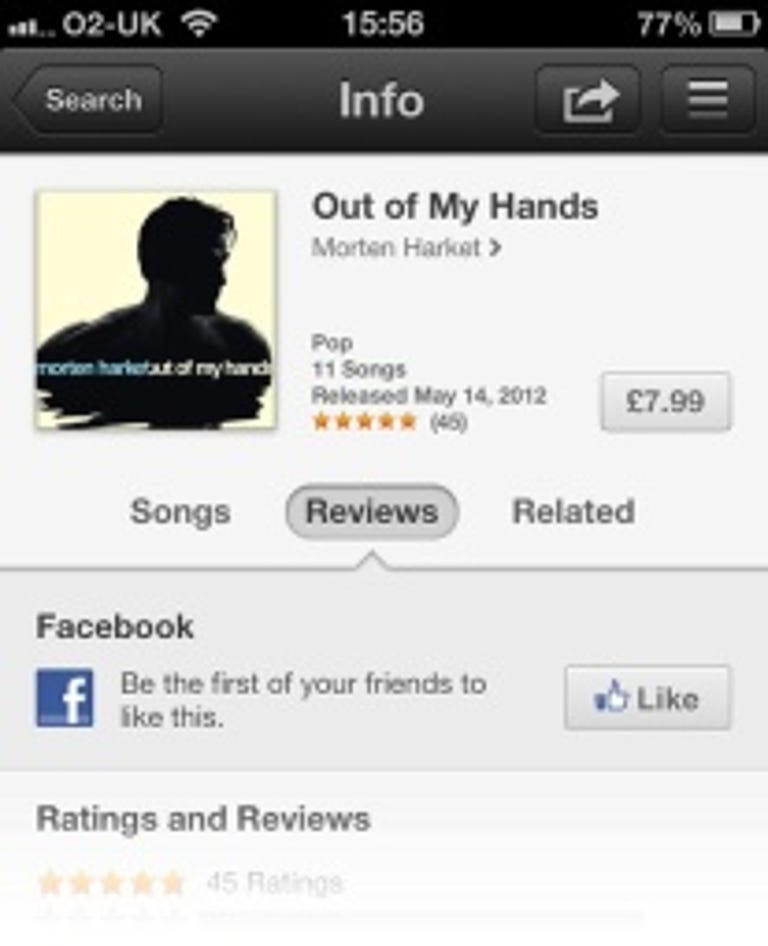
Ping, Apple's own iTunes-based social network, is set to close. In its place, you can now 'Like' tracks and albums on Facebook from right within the iTunes Store.
Open a track or album listing, tap Reviews and you'll find the Facebook like button immediately above the ratings.
Likewise, improvements to the App Store mean you can get a better view of your search results, with large panels for each one showing larger headline grabs.
Compared to this, the iOS 5 app store looks positively pokey.
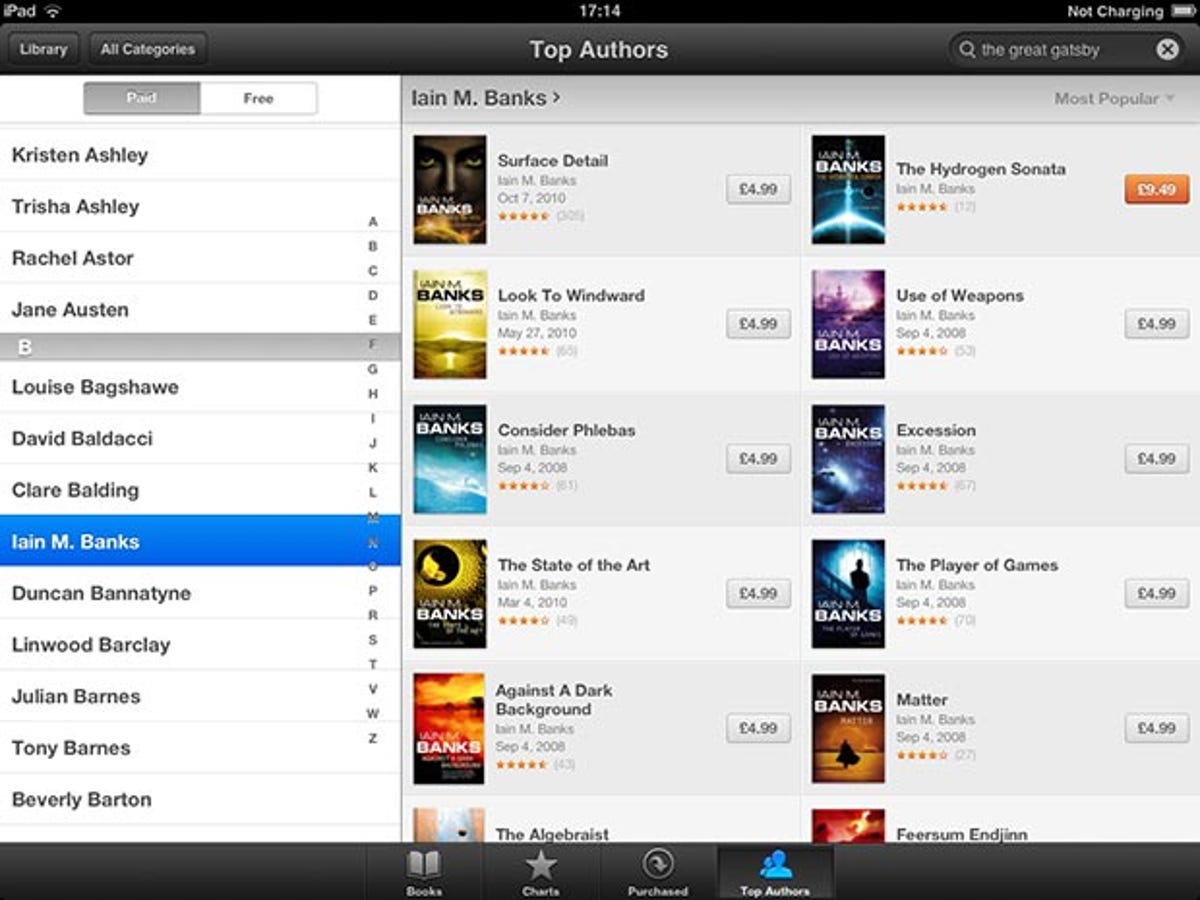
31. iBooks bolstered
The iBookstore is a far more pleasant place to look for some new reading material, sporting the same Coverflow interface as the Music Store. This allows you to swipe through the various offerings or drill down into individual sections and lists of top-selling books and popular authors. Books available for pre-order are marked with an orange price sticker, as you can see in the grab below.
Maps
Maps marks perhaps the biggest change in Apple's latest OS. As well as dumping Google's YouTube app in this release, it's also switched away from using Google Maps in the Maps application, instead relying on its own map data, plus directions from TomTom.
32. Textures and depth
Maps now have more depth thanks to improved 3D rendering, even on the older second-generation iPad. A 3D button in the corner of the display lets you switch between a regular top-down and slanted view, through which you can gaze across the landscape. Dragging and twisting the view shows off the 3D lay of the land at its best.

33. Take the world for a spin
Satellite maps render very quickly on a consumer broadband connection, and it's easy to move around them by dragging and letting go, which causes them to slide along and then glide to a stop. Putting two fingers on the map and twisting them around lets you get a different view of the scene by turning it in the same way you'd twist a physical map. This works in both 2D and 3D modes, and tapping a compass icon in the top corner quickly reorientates the map so that north is at the top again.

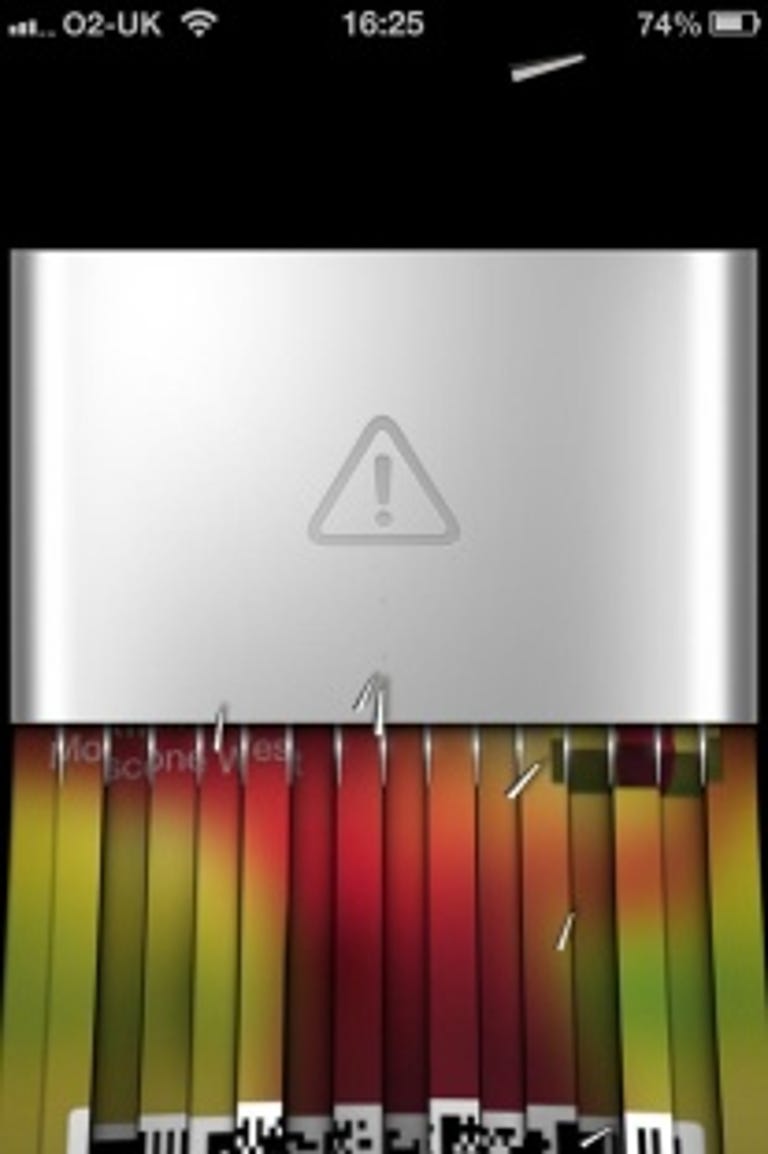
34. Buildings with depth
It's not just the landscape that's been rendered in 3D either -- so have the buildings in some key cities. San Francisco, which you can see in the grab below, is a great example, in which the buildings really do rise up out of the ground.

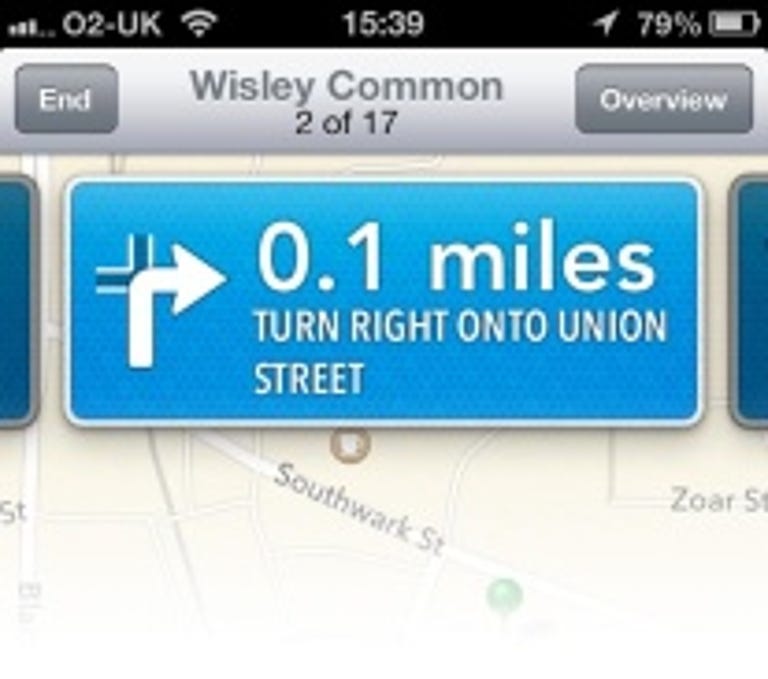
The new directions engine from TomTom produces very similar routes to the iOS 5 implementation, but the way they're presented is now far clearer.
Large motorway sign graphics at the top of the screen highlight each turn, and sliding them left and right across the screen moves forwards and backwards through the route, updating the map view below.
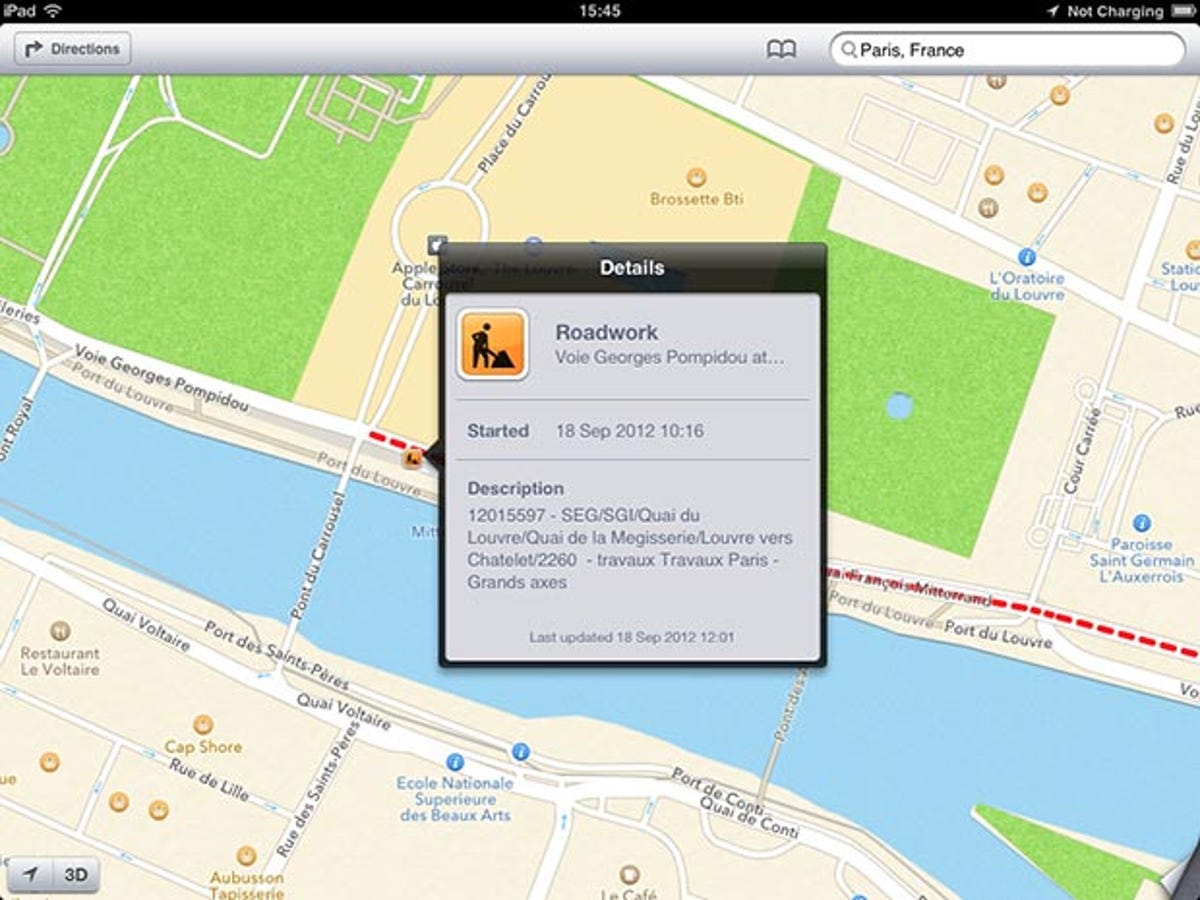
36. Traffic problems
Maps has long been capable of showing you where there are hold-ups and slow traffic courtesy of coloured lined on the road (you'd be advised to avoid routes dotted red as they're congested). Now, though, you can also see what's causing the hold-up as a series of icons on the map highlight accidents, alerts and roadworks. Tapping on them calls up a floating panel giving further details.
Passbook
As soon as magazines and newspapers started to create their own apps, our iOS home screens began getting very cluttered. Apple solved this problem in iOS 5 by introducing Newsstand, a special folder to contain them all.
Now it's done the same with vouchers, tickets and loyalty cards in the form of Passbook, an iPhone-only tool that doesn't appear on the iPad.

Passbook is a simple folder for the various digital tickets and slips that previously would have been rendered in cardboard or plastic and slipped into your wallet.
Vendors can send you vouchers or membership cards, plane or train tickets and so on in an email, or allow you to download them from a website.
So long as they're compatible, they'll be neatly filed in Passbook.
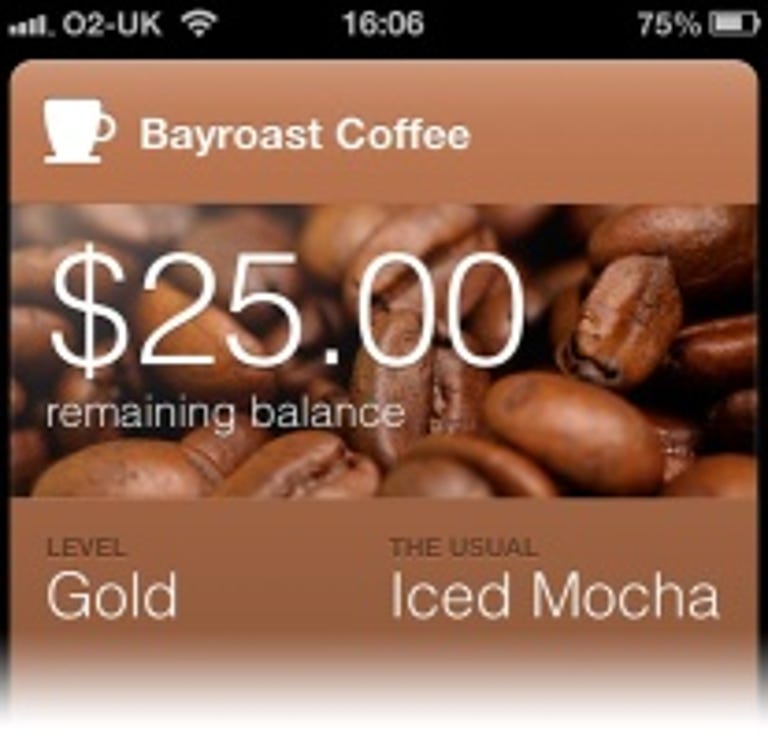
Passbook documents can be set to be location aware. This would allow a coffee shop loyalty card to pop up on your Lock Screen, for example, when it detected that you were walking past the shop's front door.
When you popped inside, it would be ready for the barista to scan the barcode or QR code, or type your details into the till so that you could collect or redeem your points, or enjoy a discount.
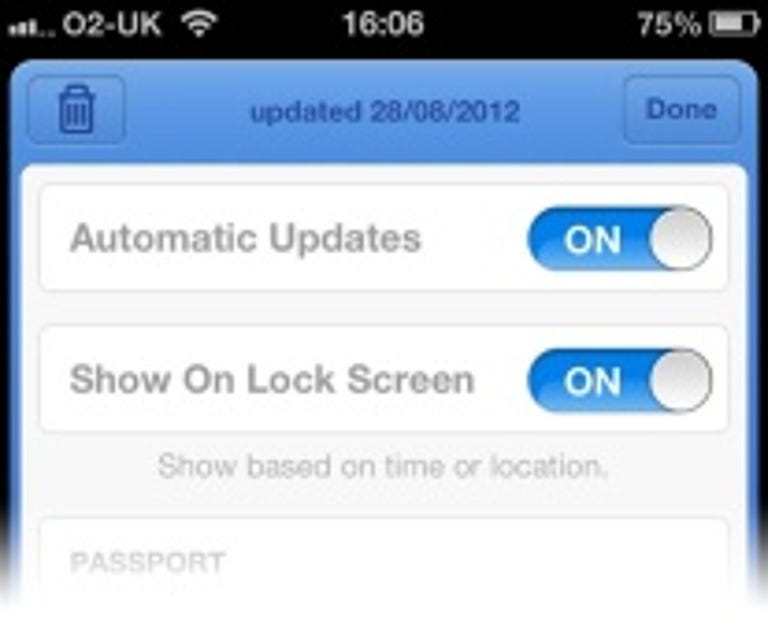
Sometimes the information on a Passbook document will change after it's been issued. Airline tickets are a prime example here, as the flight time or gate could change at the last minute. Flipping over the ticket by tapping the 'i' in the bottom corner will let you check that it is authorised to accept Automatic Updates, which would enable the airline to push the amended data directly to your phone.
In much the same way that you should get into the habit of shredding old tickets and receipts from your wallet, you can shred the expired contents of Passbook. Flip around any voucher you don't need any more by tapping the 'i' in the bottom corner and then tap the trash icon and confirm that you want to delete the selected pass.
Passbook will run it through the shredder and remove it from your wallet.
Phone
It's easy to forget that the iPhone is actually a phone, as well as everything else. Naturally, the features in this section, while being integral to iOS 6, only work on the iPhone and not the iPad or iPod touch.
41. Swipe calls to reveal options
As well as the regular answer and decline options, you now have several other ways to quickly handle incoming calls. Swipe up on the screen rather than tapping either button when a call comes in to open up the menu, from which you can dispatch a text message or set a diary note to call them back.
42. Decline politely
There are often times when you don't want to take a call right away. For these occasions, set up your iPhone to reply to the caller with a text message. You can set three default messages to handle calling them back later, telling them you're on your way, or asking them what they want through Settings > Phone > Reply with message. If none of these is appropriate, tap Custom to type a new message on the spot.
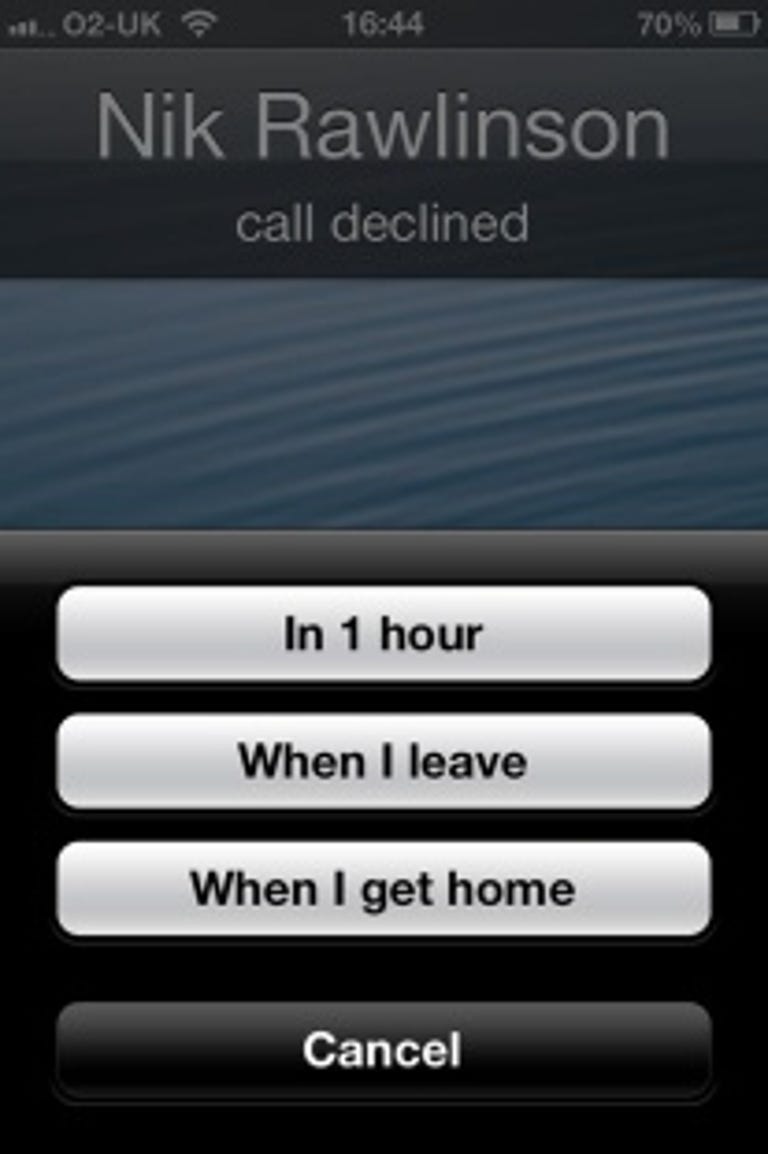
Alternatively, tap Remind Me Later to send the caller to voicemail and then specify when you want to be reminded to call them back.
As well as an option to call in an hour, you can be reminded when your iPhone detects either that you're leaving your current location, or you're arriving at the location saved on your own card in Contacts as your home address.
It uses the integrated GPS receiver and Wi-Fi IP look-ups to determine when this might be and where you are.
Best of the rest
There are literally hundreds of tiny improvements in iOS 6, but we'll sign off with seven handy but not essential add-ons that give it a little extra spit and polish.
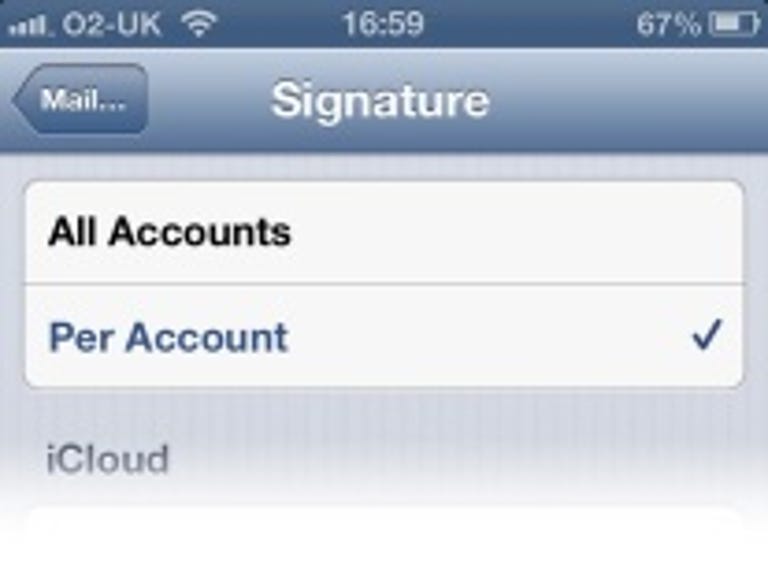
In iOS 5 and earlier, it was only possible to set a single signature, which was used by all of your email accounts, meaning you signed off in the same manner on both your personal and business messages. This isn't always appropriate, so iOS 6 now lets you set signatures on a per-account basis if you choose.

Podcasts are no longer part of the Music application. They've been hived off into an app of their own called, naturally enough, Podcasts.
It's a free download from the App Store and includes a comprehensive catalogue of available subscriptions and downloads in both audio and video format.
With increased ways of getting in touch with friends and family -- and a commensurate broadening of the ways in which they can get in touch with you -- there are more ways to be notified.
There are now more events for which you can set alert sounds, along with a built-in alert tone store selling current songs available for use as tones.
47. Panorama photography
Panoramic photography, which has been common on consumer digital cameras for many years, finally comes to the iPhone in iOS 6, without the need for a third-party app.
All you need do is sweep an iPhone 4S or 5, or a fifth-generation iPod touch across the scene in front of you and it'll stitch together up to 240 degrees of the view, either vertically or horizontally. This feature doesn't work on older iPhones or any iPad.
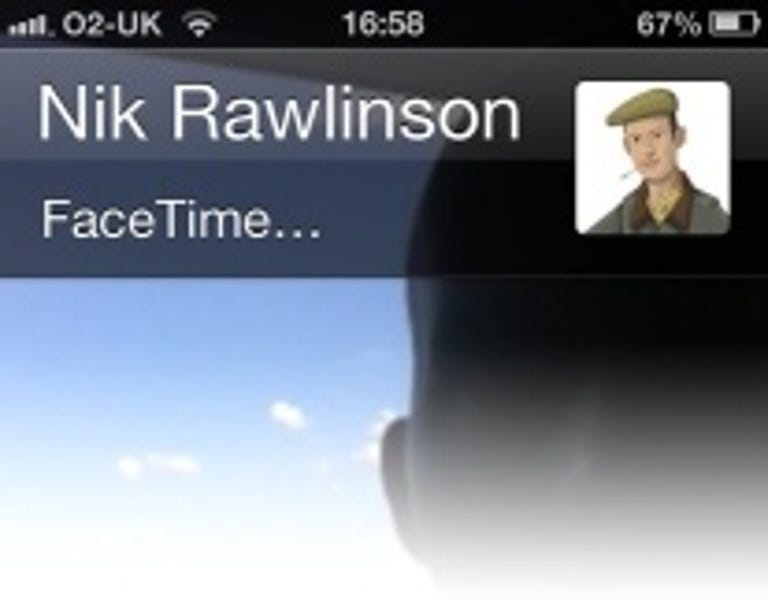
This one is dependent on your phone network provider, but FaceTime can finally be used over 3G and 4G connections. Previously it was restricted to use only over Wi-Fi. So long as you have sufficient data left in your monthly bandwidth allocation, you can now video conference from the train just as easily as you can from home.
49. Siriously useful
Siri was conspicuous by its absence from the new iPad, but upgrading it to iOS 6 adds in the Siri features that were missing. Previously the only part of Siri that these devices could use was the dictation tool. Other improvements to Siri are largely aimed at a US audience, although it does now support more languages than it did at launch, and Apple is adding to its repertoire by the day.
50. The four-finger shuffle
Gestures are nothing new -- they've been part of iOS for the last few releases, but if you can learn just three, they'll do a lot to prolong the life of your iPad by saving you from clicking the Home button quite so often as you do on an iPhone.
Put all four fingers on the screen, slightly spread out, and slide up to reveal the task switch bar. If you want to cycle through your applications, swipe them to the left and right instead of sliding them up. And if you want to return to the home screen from any application, put all four spread-out fingers and a thumb on the screen and bring them all together to close your current app.
Do you have any tips of your own? Share them in the comments below or over on our Facebook page.