How to use WordPress as a basic CMS
We show you how to setup WordPress as a basic content management system, giving you a more efficient way of organising stacks of content.
Initially launching as a simple blogging tool in 2003, WordPress has evolved into a capable content management system (CMS). Whether you run an online magazine, a multi-author blog or you simply want a more efficient way of organising stacks of content, WordPress is a simple to learn yet highly customisable platform.
This guide assumes you've already purchased a domain name and some Web hosting, as that's what we'll be installing WordPress on. Installing it on to your own Web hosting (as opposed to letting WordPress.com host the files) will give you more flexibility and control over your site.
Before you start, it's worth bearing in mind that tweaking your design can be a delicate process. Accidentally deleting a vital line of code can make your homepage go from perfection to suddenly looking like it was designed by a blindfolded 6-year-old after a tube of blue Smarties.
Read: The best web hosting providers | The best website builders
Check out our guide on how to install WordPress on a local server -- doing so means that any design tweaks you make will only be viewable by you before you unleash them on an unsuspecting Internet.
Installing WordPress
The first thing you need to do is upload the core WordPress files to your web hosting -- download the latest build at WordPress.org. Once you've done that, point your mouse at this page and follow the instructions on how install it. It should only take between 5 and 10 minutes -- make a cup of tea beforehand and it'll be the perfect temperature by the time you're done.
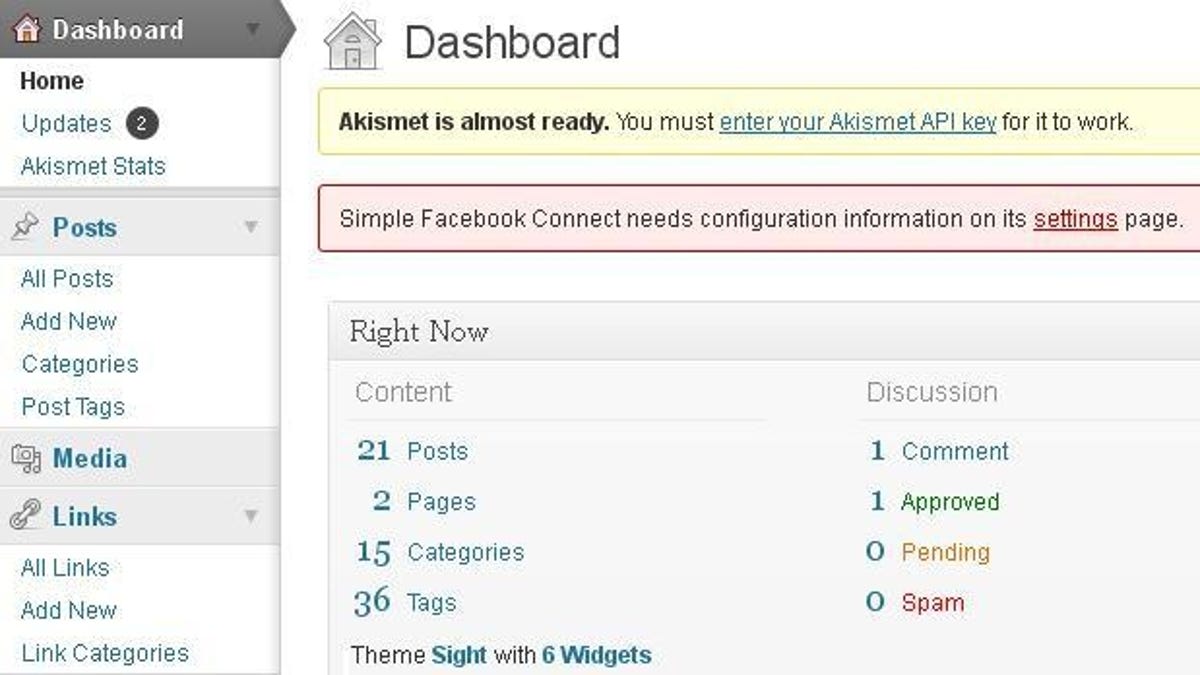
After it's installed, you'll be asked to login with the username and password you chose. You're then taken to the central hub of your WordPress site -- the dashboard. Save yourself hassle by bookmarking it now.
Checking the basics
1. To ensure that setting up your site runs smoothly, you need to make sure a few options are set correctly. Click on Reading under Settings in the left-hand column and make sure Front Page Displays is set to Your Latest Posts before clicking on Save Changes.
2. Click on General, under Settings in the left-hand column, and uncheck the Anyone Can Register checkbox. This isn't needed, as we're going to be using Facebook to handle any user-submitted comments. Set the New User Default Role to Contributor and then click Save changes.
Installing your theme
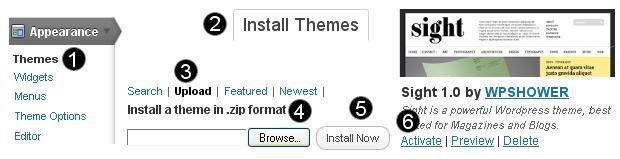
1. Once WordPress is installed, you'll need to get yourself a theme. The default theme, TwentyEleven, is pretty enough, but it's more geared toward standard blogging and lacks CMS functionality. We're going to use an open source magazine-style theme by Wpshower.com called Sight. Download it here and place the zip file on your desktop. (Note: Although wpshower is a trustworthy site, other free themes can come with nasty code included in them. See this article for more details.)
2. Go back to your dashboard and click on Themes, which is located down the left-hand column, under Appearance. Then click on Install Theme. Click on Upload and then Browse to select the zip file containing the Sight theme. Clicking on Install Now will present you with a preview of the theme. Finally, click on Activate to make it go live.
Adding categories, users and pages
1. Your site will now be using the new theme, but it'll be looking as empty as a chocolate fireguard shop. The first thing we need to do is create some categories.
In your dashboard, look for Categories in the left-hand column under Posts and give it a click. The only fields we need to take note of for now are Name and Parent. Type in the name of your first category: Sport, for example. WordPress categories work in hierarchical structures, so for the first one you will have to leave the parent as None. Click on Add New Category at the bottom to create the category.
Now, you can either create another parent-level category, or create a child category -- for example, Football. Try adding a few categories to form the backbone of your CMS.
2. After adding your categories you need to add them to your navigation menu. Click on Menus under Appearance in the left-hand column. Click on the Navigation tab and tick Automatically add new top-level pages.
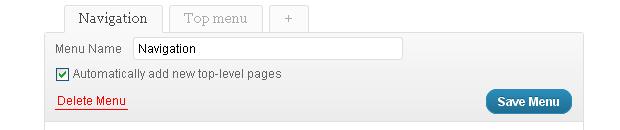
3. Go to where it says Categories at the bottom left of that screen. Click on the 'Select All' link and then click Add to menu. Navigate to the blue 'Save Menu' button (shown above) and give it a click. Your categories will now appear in your site's header.
4. If you're going to be running your site in conjunction with other people, you'll need to add them as users and set their levels of access. Click on Add New, under Users in the left-hand column. Fill out their details and tick the box that says 'Send this password to the new user by email'.
In the drop-down box next to Role, select how much access you will want to give that person. If you want them to be able to submit articles, as well as editing other people's articles, choose Editor. If you only want to grant them the ability to submit articles to the site, select Contributor. Have a peek at this page for a full list of what users of each role can or can't do.
Tip: You can either ask other writers to email you their posts for you to edit and upload, or they can log into the site through http://www.yourwebsitedomain.com/wp-admin (substituting yourwebsitedomain.com for your own domain), submitting the article themselves through the dashboard.
3. You might also want to add a few pages that will house some information about your site, for example an About Us page, or a standard contact page. Click on Add New under Pages in the left-hand column. Give it a title, type something in the main text box below and click on Publish to save your page. It's best to stick to five pages with this theme, as that's how many it will display comfortably next to your logo.
Customising the theme options
The Sight theme comes with a few configurable options from the off. In your dashboard, click on Theme Options in the left hand column, under Appearance. Click on Upload Your Logo to change your site's main logo (note that you should make it 290x128 pixels to avoid stretching). The theme already comes with a fancy background, but you can upload your own should you so wish to.
Adding Content
1. To add a new article, click on Add New under Posts in the column on the left. Enter a title and type the first sentence of the article in the Excerpt box. The excerpt will appear to the right of the homepage banner image. Enter the rest of the post into the large text box.
You then need to add any relevant tags (which WordPress uses to perform searches) and select the categories on the right-hand side that the post belongs to. Don't forget to use the dropdown box under Author to select the person who wrote the post.
2. Your homepage features a big, beautiful, sliding banner, but it isn't going to appear until you tell WordPress which posts are going to appear in it. You would typically choose your most engaging content to be associated with the banner -- features, for example.
Firstly, either create a new post or load up an existing one. Underneath where you select the categories, tick the box that says Show in Slideshow under Slideshow Options. Underneath there, click on Set featured image. Click on the Select Files button, locate the image you want to use (640x290 pixels to avoid stretching) and double click on it.
You'll then be presented with a new window that says Use as featured image at the bottom. Click on that and then click on Save all changes. Click on Publish or Update (depending on whether the post is already published) and check your homepage to see your new banner in all its sliding glory.


3. Note that you'll need to attach an additional thumbnail image to each post for the archive page (the page you get when you click on a category) whether that post is going to appear in the homepage banner or not. While you're editing a post, click the square image on the left, shown here: Now click Select Files and then double click on the image that you want to include. Click on Set featured image, copy all of the writing in the box that says 'Link URL' and then click Save all changes in the bottom left hand corner.
4. Return to your post and look just under the Excerpt box for the Custom Fields box. There will be two text fields -- one on the left, under Name, and one on the right, under Value. Under where it says Add New Custom Field click on Enter New. Type in 'mini-thumb' (without the apostrophes) and click on Add Custom Field.
In the right-hand box paste the link URL that you copied earlier and click on Update. Click on publish to save all of your changes. This process is a little less longwinded after the first time because, after creation, new custom fields are stored for easy access.
Configuring the Facebook Simple Connect plugin
While overloading your site with too many plugins (we're talking 40+ here) can slow down load times and cause conflicts, using a few carefully chosen ones can do wonders for transforming your site into a smooth, mechanical CMS, adding additional functionality and enabling you to better engage with your readers.
Sites are increasingly ditching native comment sections in favour of an embedded Facebook comment system. This might not be suitable for every site (an online privacy forum would probably have some issues with it), but most people in the UK have a Facebook account and are happy to comment under their real name.
1. Click on Add New under Plugins in the left hand column. Under Search, click in the box and type 'Facebook Simple Connect' and hit enter. When you've found it, click Install Now and then click OK. Finally, click on Activate Plugin. In your dashboard's left-hand column, under Settings, click on Facebook Simple Connect.
2. Configuring the plugin initially looks overwhelming due to the instructions you're presented with, however, if you follow the instructions underneath 'Haven't created an application yet?' you can't go far wrong.
Firstly, you need to create a Facebook app. After you've done that you need to get hold of the Application ID and the Application Secret. Enter them in the boxes on the settings page and click on Save changes at the bottom to add a neat little Facebook-powered comment form underneath the articles on your site. It should look like this:

Configuring widgets
1. Widgets are used to display snippets of information around your site. Usefully, the Sight theme comes with a few pre-installed. Navigate to Widgets underneath Appearance in the left hand column. The left hand side of this screen shows you what widgets are installed and the right hand side shows what widgets are active and where they are currently being shown. In the box that says 'Site Description', make sure that the only widget listed is 'Pages'. If any other widgets are in there, click on them and then click 'Delete'. If Pages isn't in there, find it on the left hand side and drag it into the box.
2. In the box below, titled Sidebar, drag in the Recent Comments widget and then drag in the Sight Recent Posts widget. Click on the drop down arrow on that widget, type 'Recent Articles' in the Title box and click save. Finally, drag the Sight Social Links widget into the same box and click on the drop down arrow. Type 'Social' into the title box.
Underneath are a selection of links that, after you click on them, allow you to enter the URLs of your site's social network profiles. Try clicking on one and then entering the URL of your social network profile (for example, http://www.twitter.com/yoursocialprofile) under where it says Profile URL, clicking on Save when you're done. Head back to your site to see your hard work aligned beautifully down your sidebar.
To pluginity... and beyond?
By this point you will have a dynamically changing, basic, yet fully functional CMS design, ready for you and your contributors to start uploading content en masse. In terms of possibilities, though, you've barely scratched the surface of what WordPress is capable of.
The good news is that plugins -- which do most of the work for you -- are numerous, easy to find and even easier to install. Have a look through WordPress's extensive plugins database and install a few you like the sound of. Take extra note of ones that come pre-loaded with widgets, as the simple process of dragging and dropping them into your sidebar makes experimenting quick and painless. Here are 10 suggestions that will enhance your site's CMS prowess in no time:
- All In One SEO Pack -- Optimises your WordPress site for search engines.
- DDPostsByAuthor -- Displays the current author's last 10 posts underneath the article.
- Sociable -- Adds links to multiple social bookmarking websites underneath the post.
- Admin Menu Editor -- Allows you to completely customise the dashboard's left hand column
- User Photo -- Displays an image of the post author on any post page.
- Contact Form 7 -- Embed a contact form into your site.
- Really Simple Captcha -- Add a captcha to go with your contact form. Prevents bots from signing up to your site.
- Cleaner-Gallery -- Add a picture gallery easily to your site.
- WP-PageNavi -- Replaces the Next and Previous links on your archive pages with numerical navigation links.
- WP to Twitter -- Automatically tweets a link to a published post from a specified account.