Switching to iPhone SE? 4 things to do on your old iPhone before upgrading
A little prep work now will make setting up your new iPhone SE that much easier.


A few minutes of prep work now will save future you some time.
Deliveries of Apple's new iPhone SE will start arriving soon, and with it comes the process of transferring all of your information from your old phone -- like your contacts, photos and apps. Setting up any new phone can feel like a chore, especially if you have a lot of apps and photos, but if you do these few tasks now, it doesn't have to.
We'll show you how to get rid of the apps you never use, double-check that your pictures and videos are backed up and create a fresh backup of your current phone. Trust me, it will be time well spent.
Get rid of app clutter
I think we can all relate to downloading an app or game just to check it out, and then never open it again. Go through the apps on your phone and remove any that you no longer use. Each app is only taking up storage space and cluttering up your home screens.
To delete apps on your iPhone, long-press on an app icon until they start to wiggle. Tap on the small "X" that shows up in the top-left corner of the app icon to delete the app. When managing my own apps, I wish Apple would have never removed the ability to use iTunes to manage them. Alas, you'll have to do it solely on your phone.
Back up your photos to iCloud or Google Photos to ensure you don't lose your precious memories.
Back up your photo library
Photos and videos are some of the most precious things on your iPhone, so make sure they're backed up. The best way is to use a photo backup service like Apple's iCloud Photo Library or the Google Photos app.
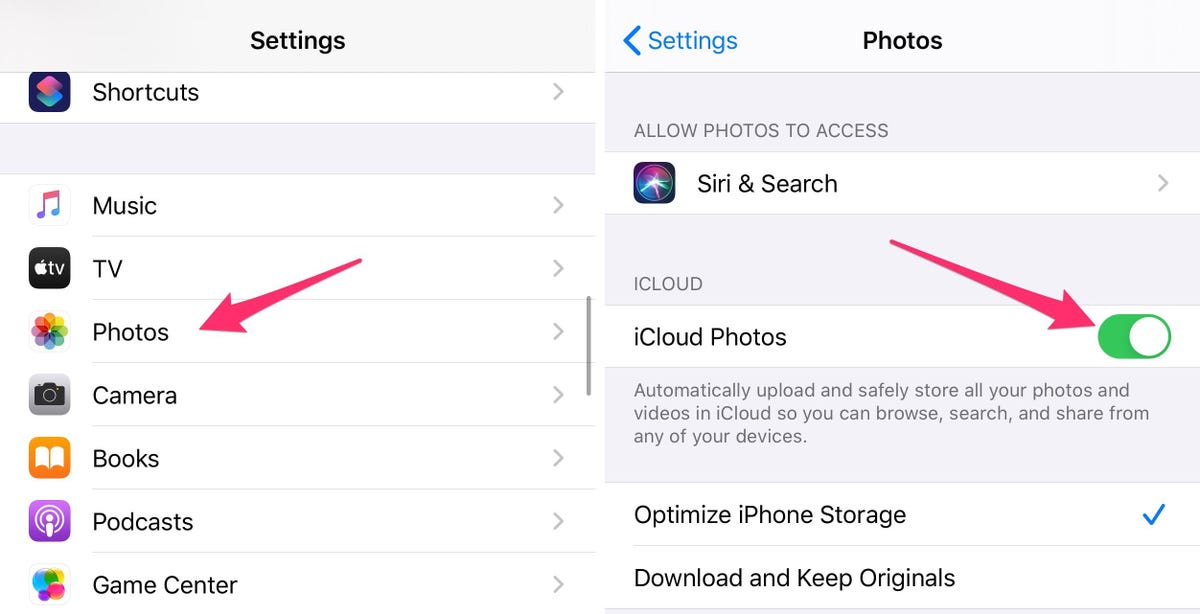
iCloud is the easiest and is built into iOS , but depending on how big your library is, you might have to subscribe to a larger iCloud storage amount, which can cost anywhere from $0.99 up to $9.99 a month. Turn on iCloud photo backup by opening the Settings app on your iPhone and going to Photos and toggle the switch next to iCloud Photos to the On position.
Google Photos offers free unlimited storage for "high-quality" photos and videos, which means Google will compress photos larger than 16-megapixels and 4K videos to 1080p. As long as you don't mind a slight decrease in quality, Google Photos is the most economical option for many. If you'd rather back up original quality, Google's storage plans range from $1.99 to $9.99 a month.
Regardless of which service you use, if this is the first time you've ever backed up your photo library, make sure your iPhone is plugged into a charger and you're connected to a Wi-Fi network to ensure your battery doesn't die, speed up the process and save your data plan.
Get rid of all the clutter using the iPhone Storage tool.
Triage your iPhone's storage
Over time, our iPhone storage (the storage on any device, for that matter) starts to accumulate random files and other junk -- just like the top of my desk. Whether it's a podcast series you downloaded but never got around to listening to, or a bunch of GIFs stored in your Messages conversations, it's far too easy to start running low on storage space.
Do you really want to bring all that junk over with you? Switching will be faster if you trim the excess now.
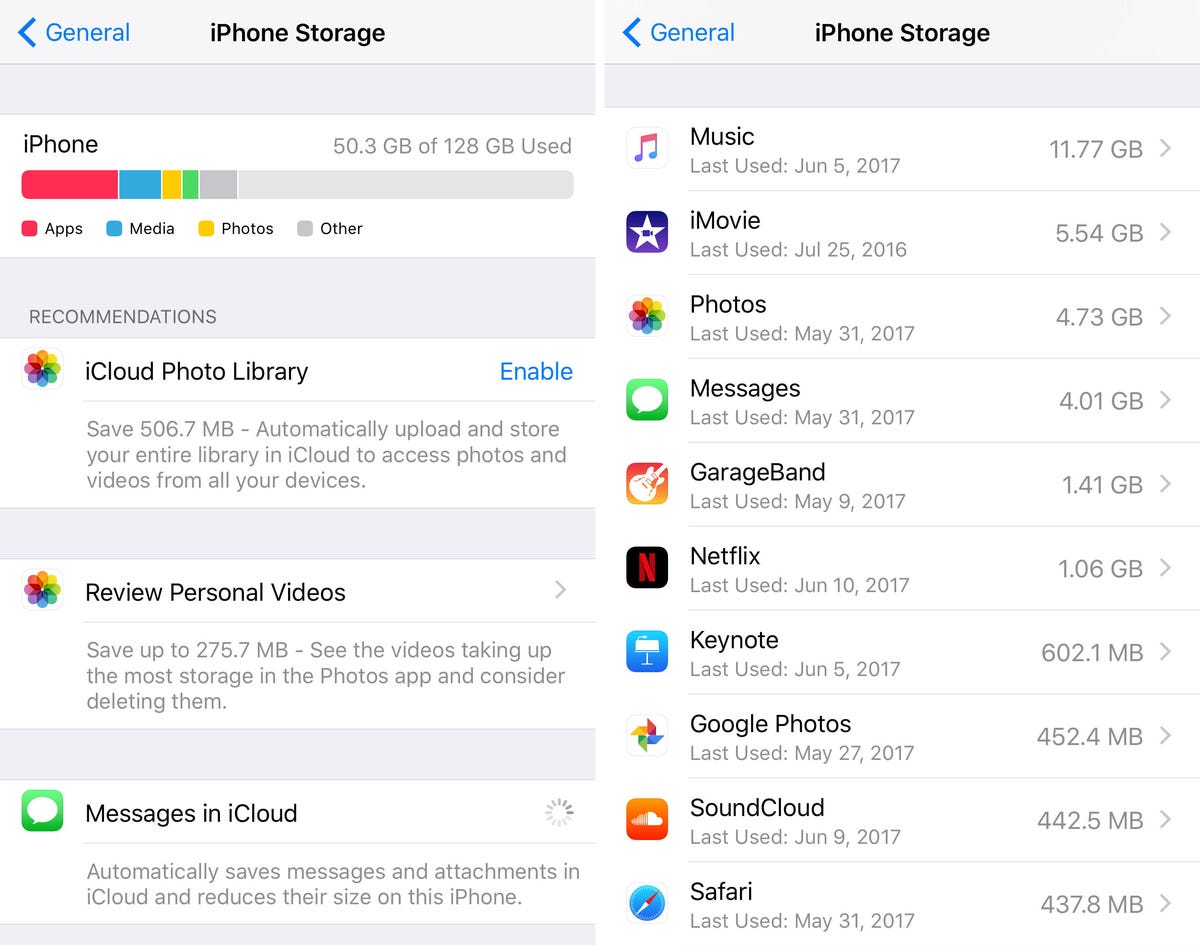
Open the Settings app then go to General > iPhone Storage and wait for the page to load. It can take a few seconds to load, depending on how much stuff you have on your iPhone. Once it does, go through each suggestion and category and decide what absolutely needs to stay, and then delete the rest.
After tidying up your phone's storage, make sure to back it up.
With that done, time to create a new backup
Finally, with storage cleared, apps deleted and precious memories stored safely off of your device, it's time to back up your iPhone. The process should go faster than it has previously, because -- in theory, at least -- there's now less stuff on your phone to back up.
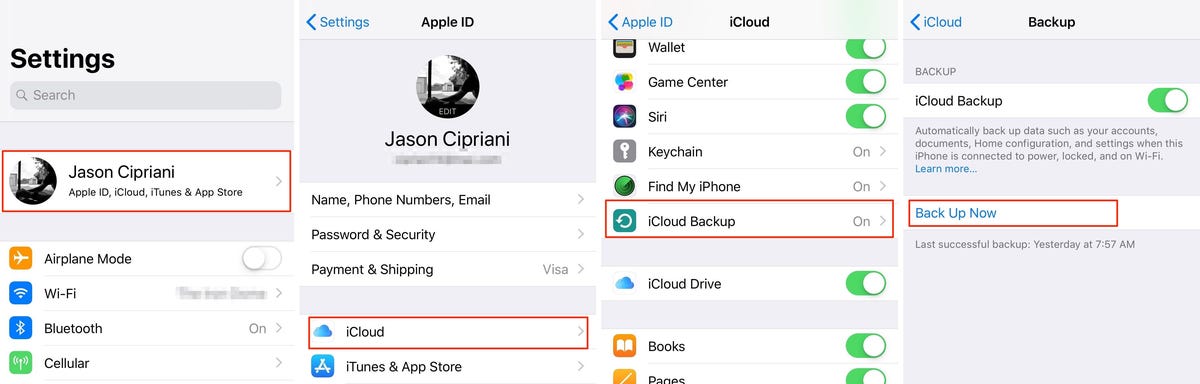
The easiest way to do this is to open the Settings app, tap on your name at the top of the list, and then go to iCloud > iCloud Backup > Back up now. Make sure you're connected to a Wi-Fi network and connected to a charger.

Alternatively, you can use your computer to back up your phone if you'd rather. We have a guide to walk you through that process.
When you get your new iPhone, the transfer process will be quicker, thanks to your work beforehand. With your old iPhone now ready for retirement, consider using it as a security camera. Once your new phone is set up, here are some things you should do first, followed by taking some time to learn the ins and outs of iOS 13.