How to make HD movies on your iPhone 4 or 4S
For very little money, you can buy the apps and accessories needed to become an iPhone movie-making auteur.
Fancy yourself the next Christopher Nolan but only have a smartphone-size budget? Let me walk you through the apps, accessories, and workflow you need to shoot beautiful movies on your iPhone 4 or 4S. Action!
With the iPhone 4 and iPhone 4S, Apple made HD movie-making cheap and accessible. They let us shoot video in glorious hi-def (up to 720p resolution on the iPhone 4 and 1080p on the iPhone 4S), and quickly and easily upload our footage to a watching world.
While Apple's top-selling smartphones are capable of recording top-notch video, their svelte bodies don't lend themselves to steady camera work, even with the image stabilization capabilities of the iPhone 4S. What's more, the built-in microphone is far more attuned to catching the cameraman's chatter than accurately capturing the drama in front of the lens.
Fortunately, with some choice apps and essential accessories, it's possible to rig up your iPhone to capture beautiful pictures and sound, whether it's for a full-length feature or a family holiday. What's more, with a killer workflow you'll be able to shoot, edit, upload, and share, all from the comfort of your mobile.
1. Apps and workflow
1.1 Film like a pro with FiLMiC Pro
The iPhone's native camera app is basic to say the least, and filming in anything other than optimal conditions can render footage difficult to use.
FiLMiC Pro ($2.99 in iTunes) is the go-to app for many iPhone videographers. It offers dozens of essential options to control the quality of your clips.
In FiLMiC Pro's settings screen (found from the cog wheel icon on the main screen), switch the "Reticle" option to "Double." This neat feature lets you manually control both the exposure (i.e. the lighting) and focus of your shots separately using the iPhone's touch screen.
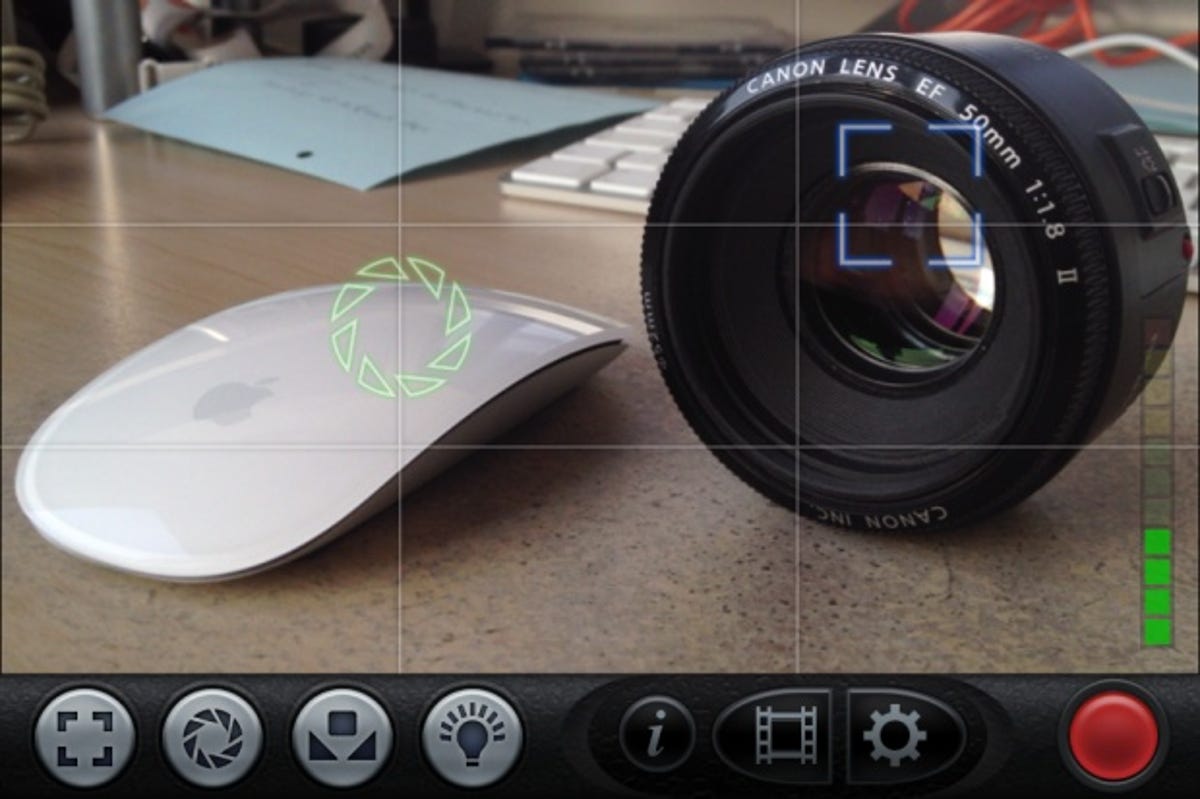
When in the app's shooting mode, move the blue box reticle on the screen to select where the camera will auto-focus, and move the green circle reticle around to sample the exposure (roughly how dark or light the overall shot will be). Both of these can be easily controlled with your thumbs when shooting.
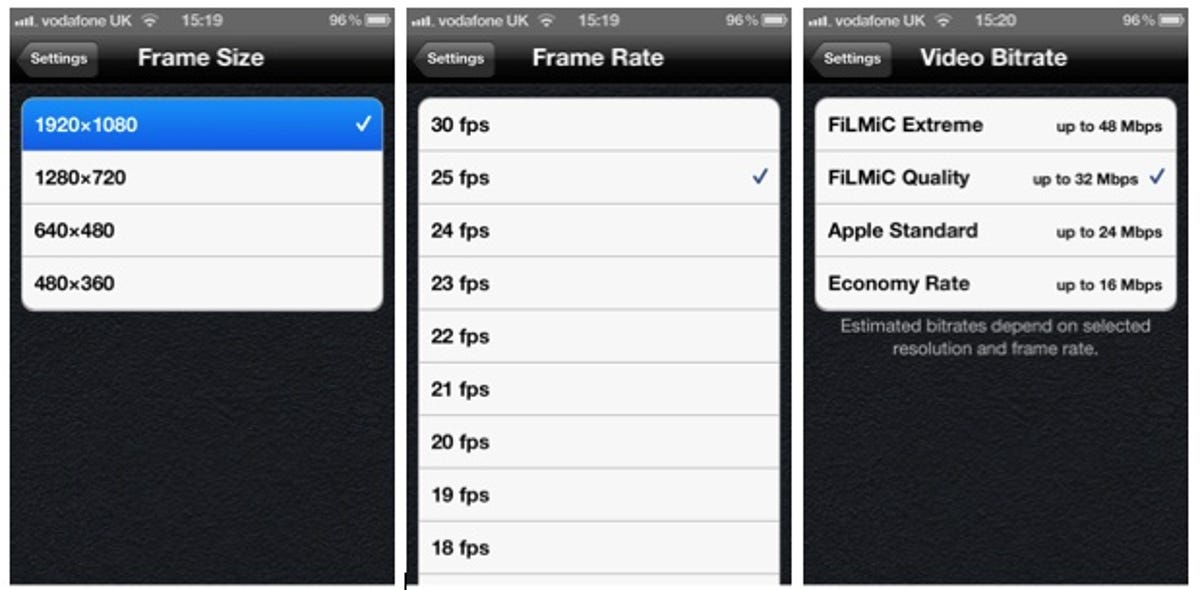
While in the app's settings screen, select "Video Bitrate" and set to "FiLMiC Quality up to 32Mbps" to enhance the quality of your movies. There is also a super-high-quality FiLMiC Extreme setting of up to 48Mbps that you might want to experiment with, but it may result in unwieldy file sizes.
In the "Resolution" panel you can set the frame size for your video. On an iPhone 4S, FiLMiC Pro lets you capture movies in Full HD 1,920x1,080-pixel resolution, but do be aware this will eat into large chunks of your iPhone's precious storage. So if space is tight, consider whether shooting in 1,280x720-pixel HD might be sufficient. What's more, not all apps support processing 1080p video footage yet.
In the settings screen, change "Frame Rate" to 30 frames per second. FiLMiC also lets you experiment with some interesting creative effects by setting the rate to as low as 1fps.
Finally, select "Save to Camera Roll" to ensure your movies can easily be accessed by other apps later on in the workflow.
As an alternative to FiLMiC Pro, CinePro is a new, fully featured iPhone videography app, available for $1.99. It includes many of the features of FiLMiC Pro, with the addition of some excellent built-in filters to tweak the look of your footage as you shoot. However, some users are experiencing bugs in these first few releases of the app, so it may be worth checking the feedback in the App Store.
1.2 Get the pro look with CinemaFX for Video
Coloring (also known as grading) plays an important part in making video look great, subtly helping to create the right mood for your movies or to balance under- or overexposed shots.
CinemaFX for Video from Nexvio is one of the more established video processing apps for iOS. At $2.99, this software lets you apply pro-looking effects and coloring to video clips taken on your camera.
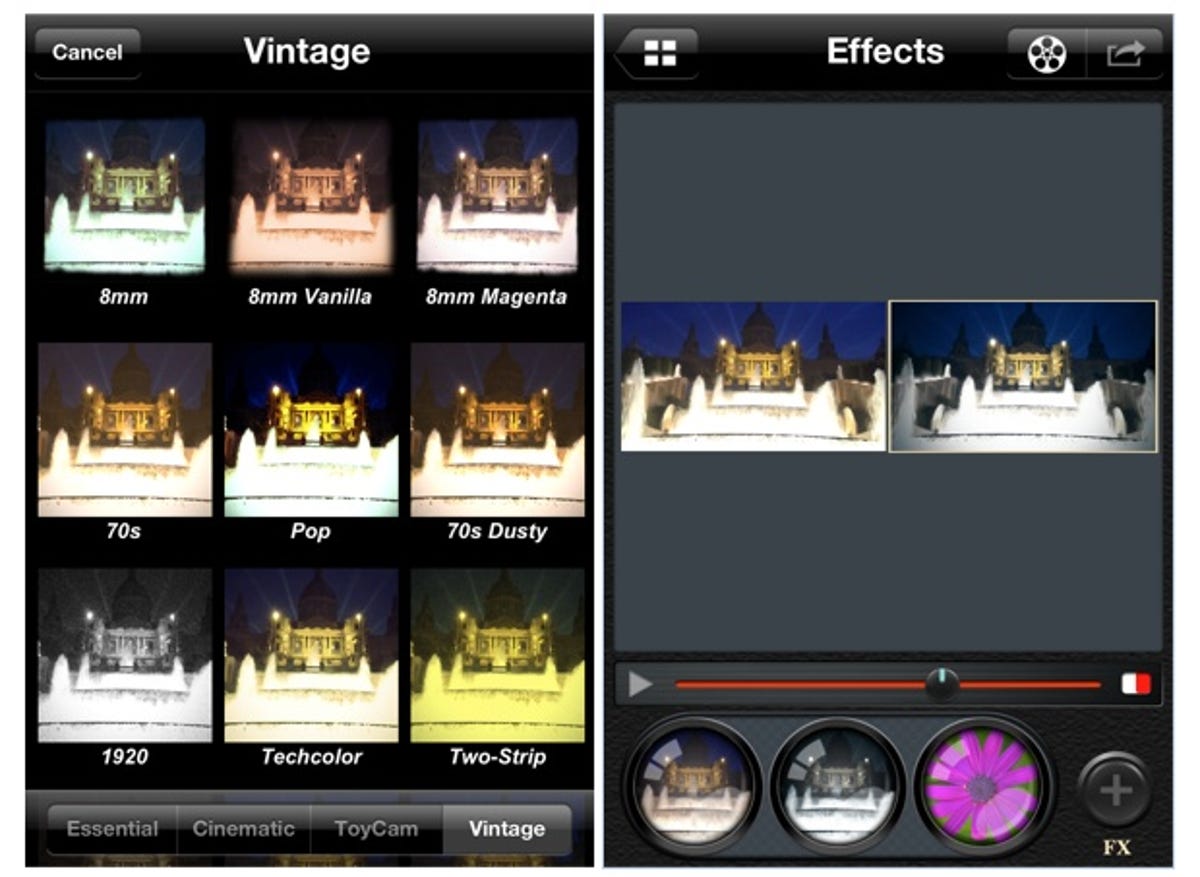
Upon opening the app, select a movie clip from your iPhone's Camera Roll. After a few seconds of processing you'll be presented with the app's main workspace. Pressing the "+FX" button at the bottom of the screen will let you choose an effect -- there are over 50 predefined effects and filters to choose from in four categories. The simplest ones let you modify the exposure, saturation, brightness, and contrast of your shots; others offer you vintage effects, cinematic warmth and vibrant colors and even the ability to make your movie widescreen.
Once you've chosen an effect it will appear at the bottom of your workspace. Tapping the effect's icon will let you delete the effect, or select the "FX Setting" button to modify the effect using sliders. Pressing the green tick will confirm your modification.
A huge plus of CinemaFX for Video is that you can stack up to three effects onto your video footage to get the exact look you want. For example, you could choose the '70s filter, add some "Dust & Scratch" and then opt for "Widescreen."
Although you can't preview the clip until you've rendered it, you can scrub through by moving the play-head slider, comparing stills of your modified version side by side with the original by pressing the button to the right of the play-head slider.
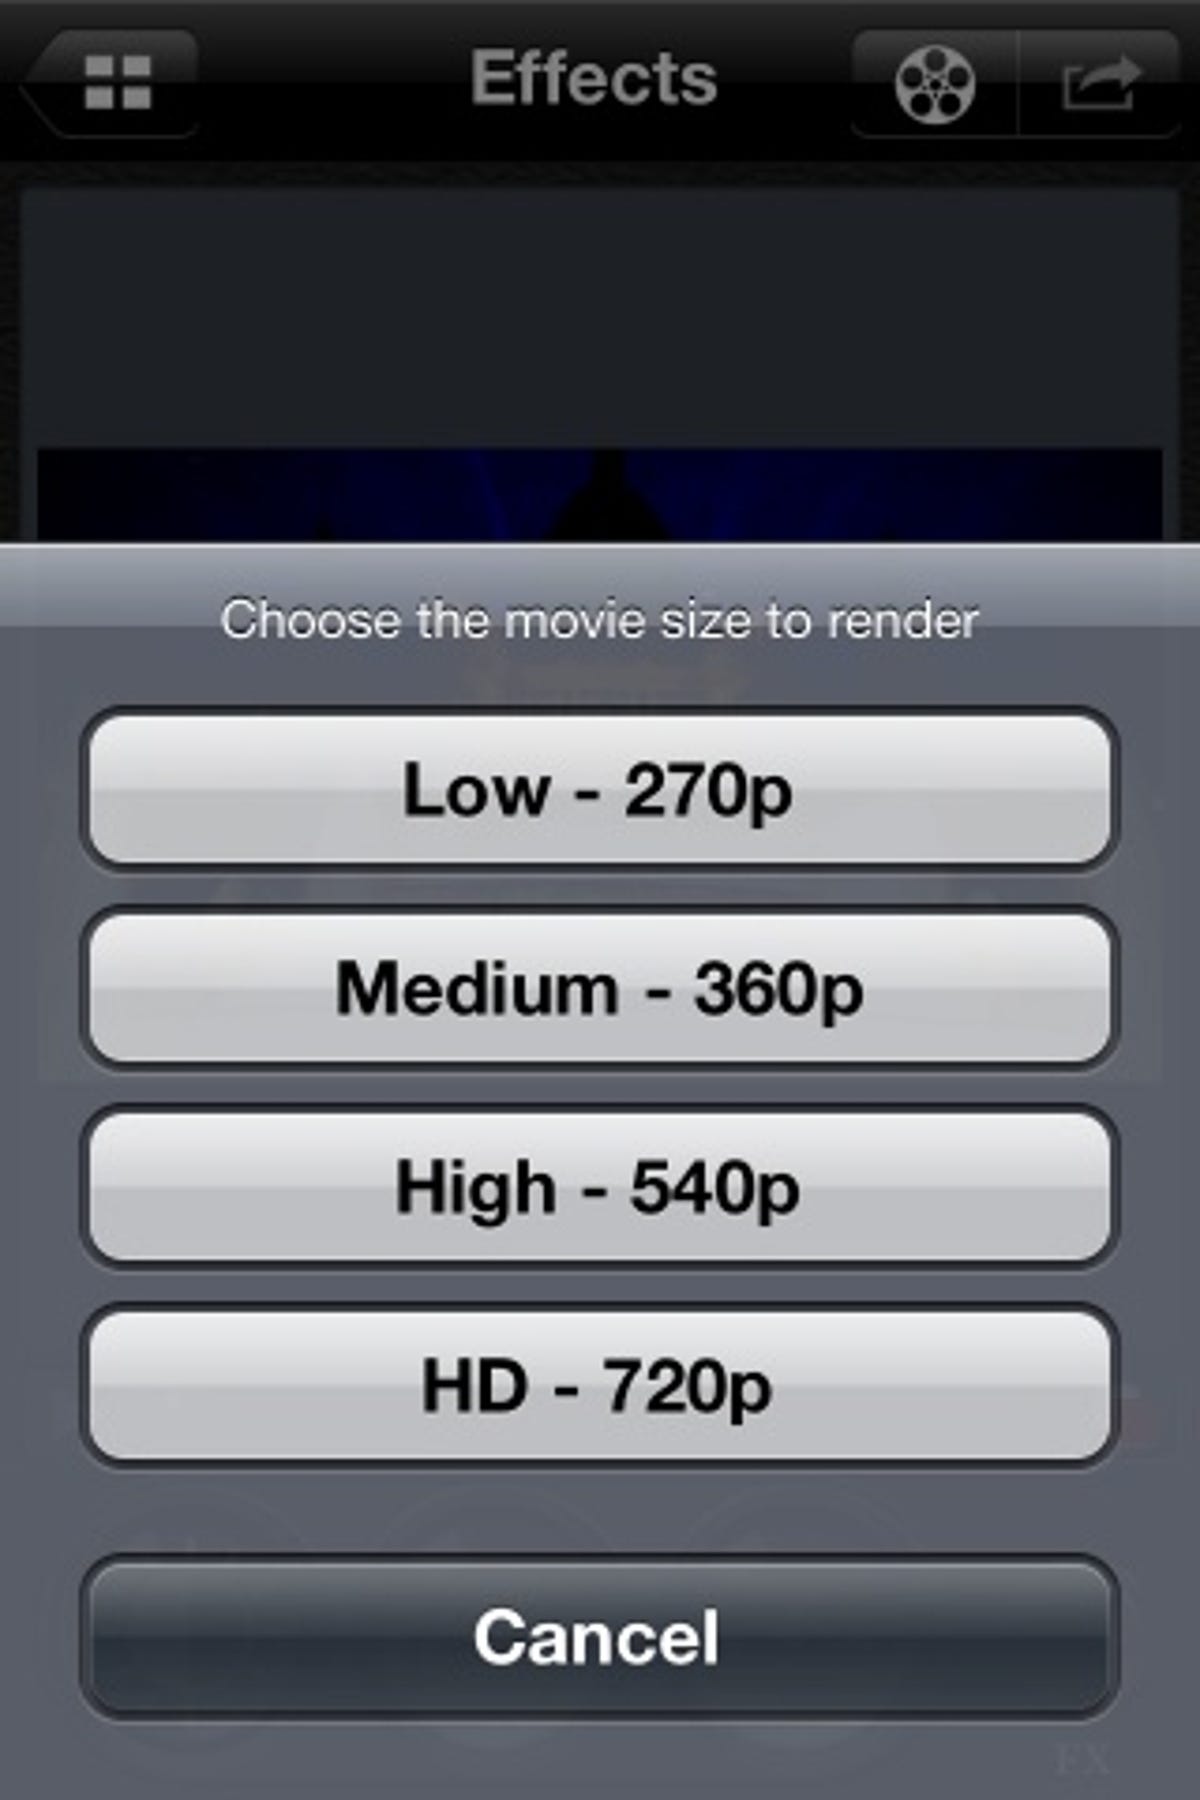
Once you're happy with your work, press the "Movie Reel" button at the top of the screen to render the footage -- select the highest resolution available (this may vary if you've chosen the widescreen effect). At this point you can preview your movie, and pressing on the "Export" button at the top right-hand corner of the workspace will let you save your masterpiece to your iPhone's Camera Roll.
CinemaFX for Video still only works with 720p footage, although it is hoped that Full HD support will follow shortly. Rendering long movie clips can take a while, particularly if you have all three effects layers applied.
There are other video effects apps to experiment with. VideoGrade by Fidel Lainez ($1.99 from iTunes) offers fewer effects and presets but will export footage in Full 1080p HD.
1.3 Cut! Your clips in iMovie
Download Apple's iMovie and for your $4.99 you get what is still the best video editor available for the iPhone.
iMovie lets you quickly and easily combine your video clips into a longer sequence that can then be exported to your iPhone's Camera Roll or uploaded directly to YouTube, Facebook, and Vimeo. You can trim your clips (choosing "in" and "out" points), rotate them (handy for arty shots), add still photos, a backing track from your iTunes library and even record narration.
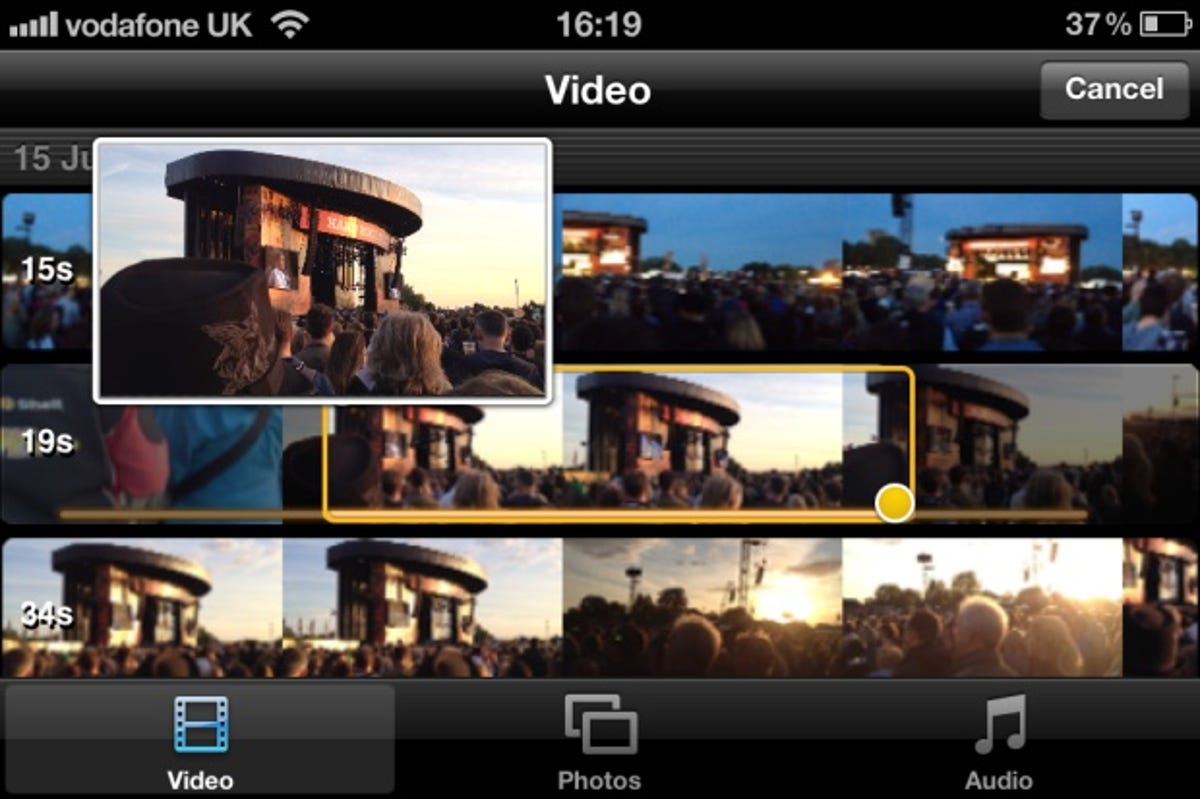
To get started, from the main iMovie screen click on the "+" icon and select "New Project." Now click on the "Add Media" button on the left to add a clip to your timeline. By default, you're presented with a scrollable preview list of all video clips in your Camera Roll ordered by date. Select your first clip and then choose the in and out points by dragging the yellow circles at the beginning and end of the clip -- a handy preview window will appear here to help you get your edit frame-perfect. Finally, press the blue arrow in the middle of the clip to insert it onto your timeline.
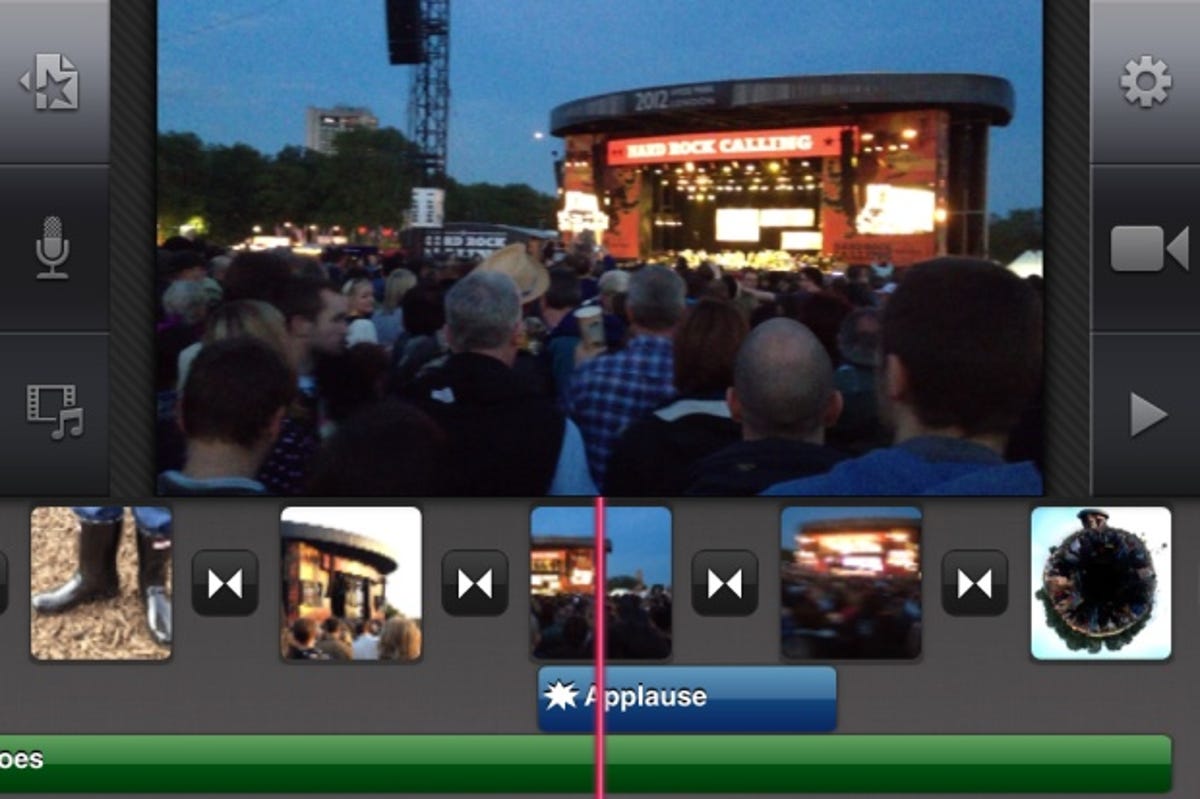
The timeline is where you lay out your video clips to create a longer sequence -- think of it as your storyboard. You can drag and drop clips to reorder them, single-tap to trim, double-tap to add a title or alter the volume, and drag and throw to delete. Pressing the play icon will let you preview your edit, as will a slow-drag across the output window or timeline itself.
Between each clip is a transition. The default iMovie transition is a 1-second cross-dissolve, but by double-tapping on the transition icon (the two triangles), you can change this to a straight cut or one provided by the theme.
There are eight themes included with iMovie for titles and transitions but while these may look very slick, they aren't customizable and do tend to get over-used.

iMovie includes dozens of good-quality sound effects to enhance your video's atmosphere, from applause to a camera shutter, although caution is again advised as they can be over-used. To add a sound effect or soundtrack from your iTunes library, click on the "Add Media" icon, select the "Audio" tab and then browse or search.
Pro-tip: if shooting and editing on location, pre-load still or video assets you've created on your desktop PC into your iPhone's Camera Roll so they can be inserted into your iMovie masterpieces on the go. These assets might be an intro or outro title or graphic and help to make your output look more consistent and professional.
1.4 Upload and share
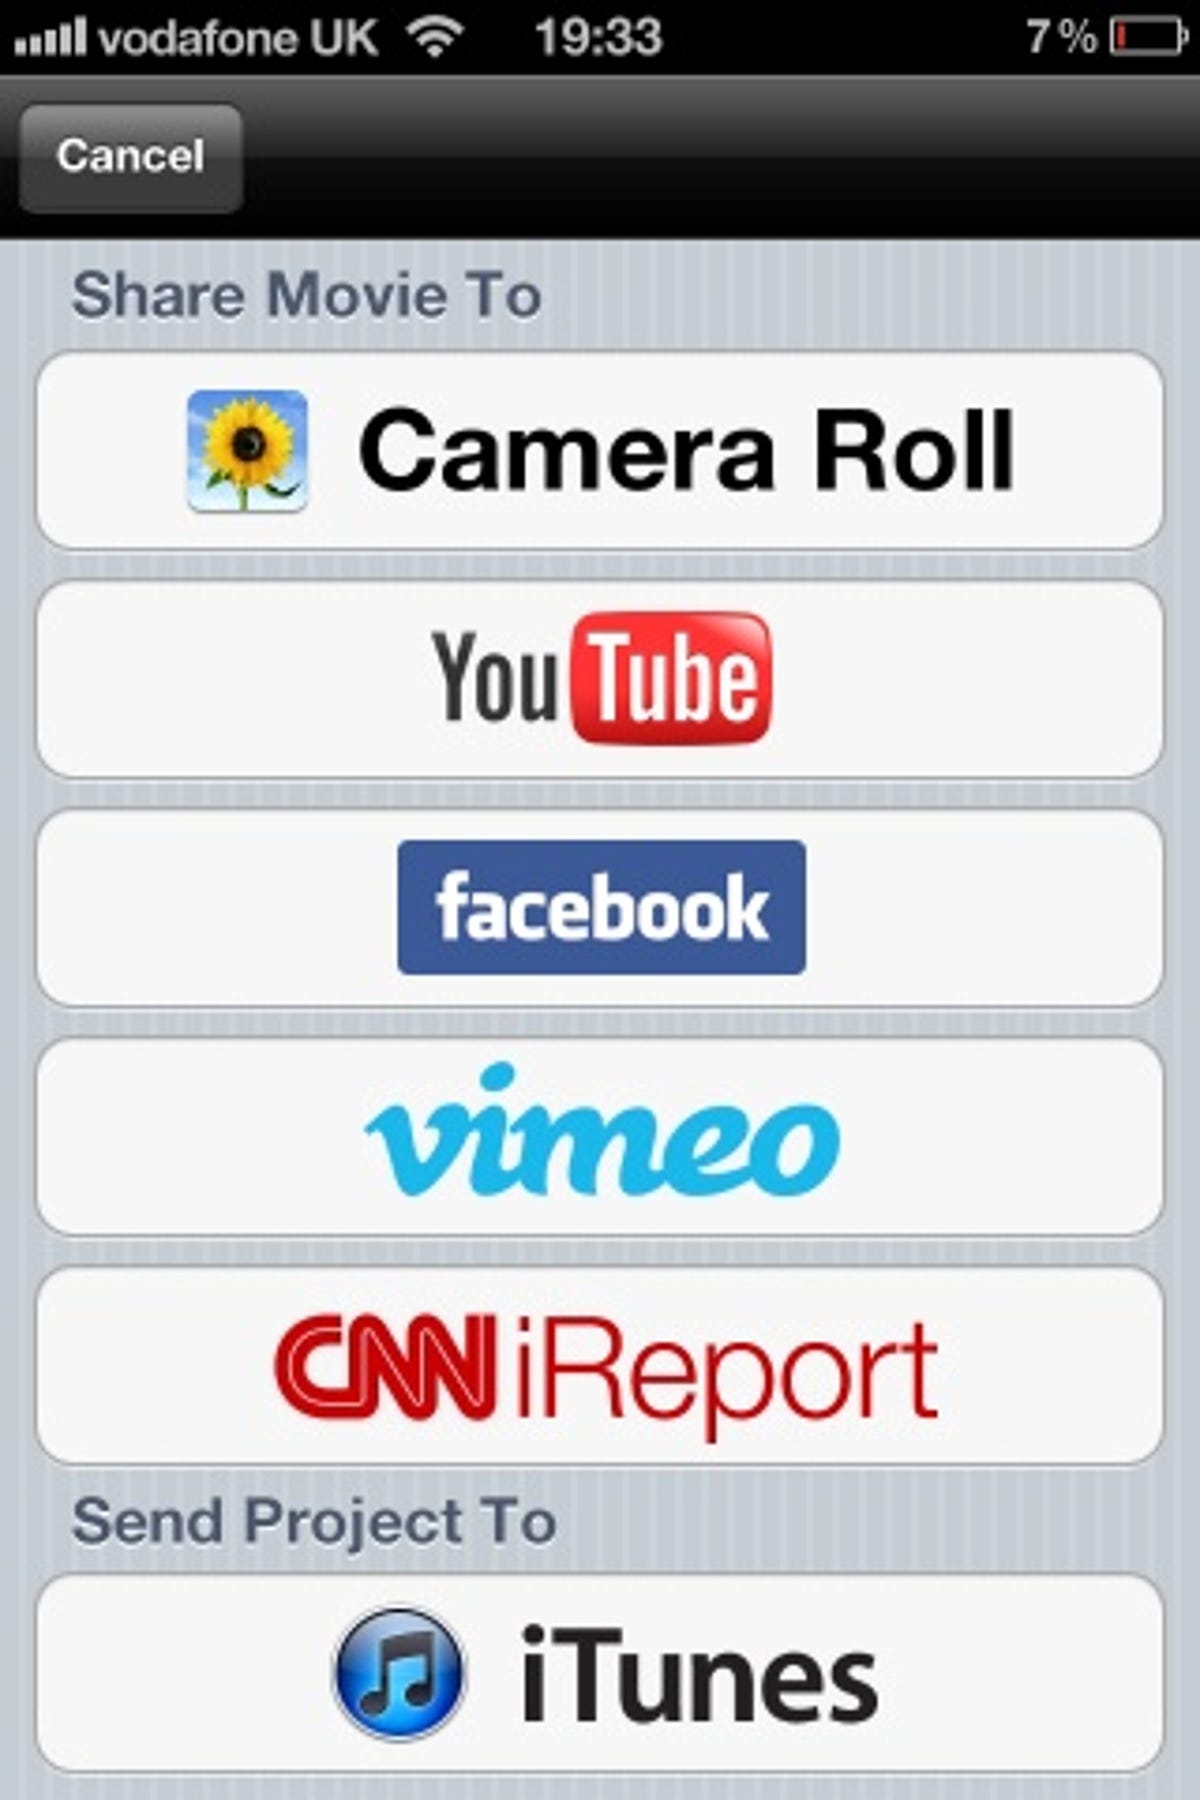
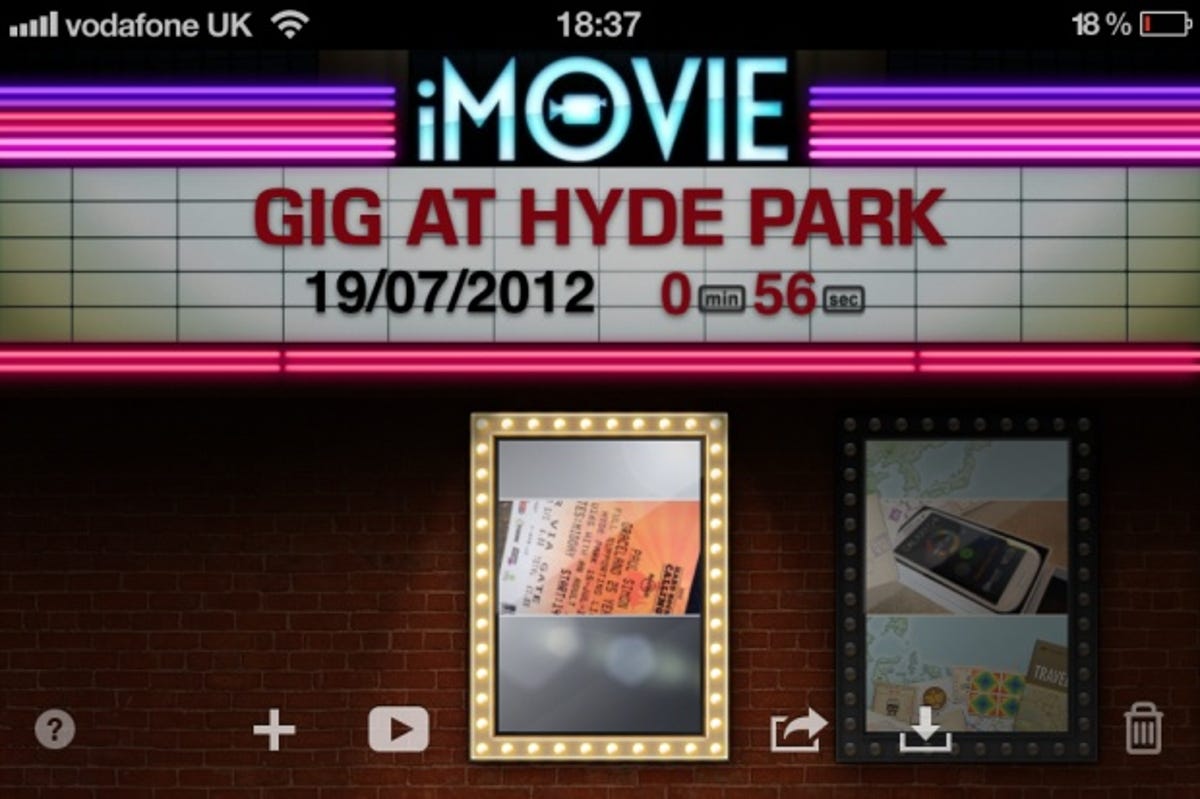
When you've finished editing your iMovie timeline, press the "Projects" icon at the top left of the screen to return to iMovie's "foyer" screen. With your project selected, select "Export" and then choose where to send your video.
Pro-tip: I recommend exporting to your Camera Roll first rather than uploading to YouTube or Vimeo directly from iMovie. Both the Camera Roll YouTube uploader tool and the iOS Vimeo app allow you to upload movies in the background, whereas iMovie uploads are foreground only, paralyzing your iPhone while a lengthy process completes. You also get a backup of your finished film in your Camera Roll, which is then easy to import into another application for further processing or uploading.
If your video content is more news-based, another destination you might choose for your work is CNN iReport -- iMovie lets you upload your news stories directly to CNN's iReport service and even includes a dedicated CNN theme.
Do keep in mind that if your contract's data allowance is limited, then uploading video can quickly eat up your quota. It might be best to find a Wi-Fi network and almost certainly avoid uploading video while data roaming abroad.
2. Accessories
Now that you've got the essential iPhone videography apps and workflow under your belt, what can you do to make sure you're capturing the best quality footage and sound in the first place? Here are some accessories that can take your iPhone filming to the next level.
2.1 Steady that camera
The Owle Bubo has been a mainstay of iPhone videography for some time.
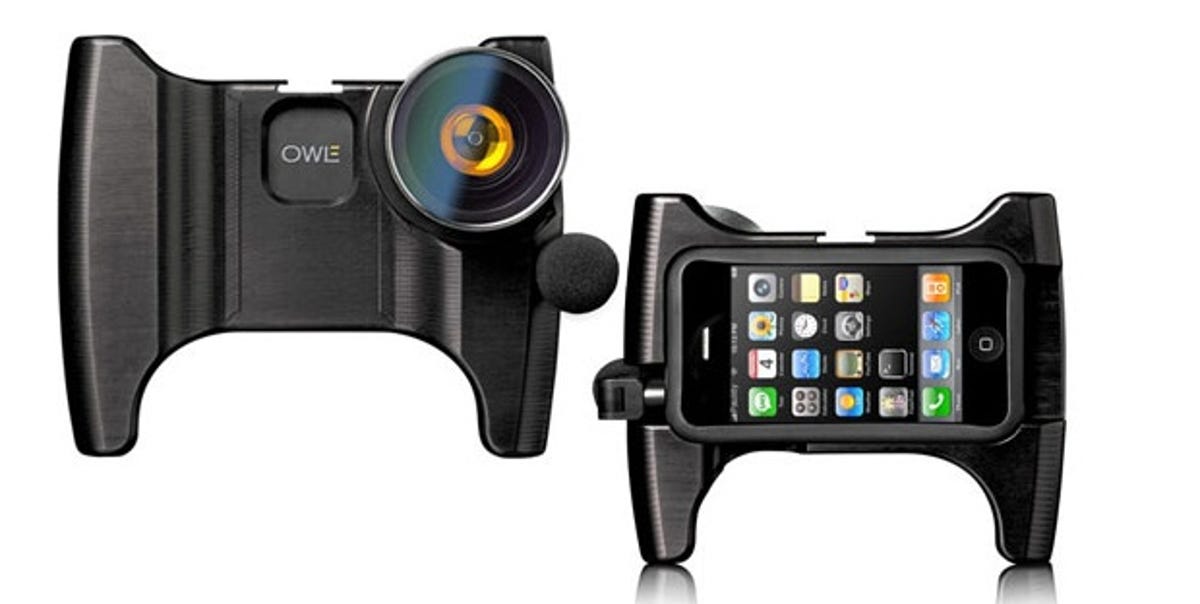
Crafted from a single slab of anodized aluminum, it provides a camera shake-killing heft, four handy tripod mounts/handles and a cameraman-friendly 37mm wide-angled lens. Add to that an accessory shoe for attaching a light plus the bundled omni-directional microphone and it's easy to see why the Bubo has become an essential weapon in any serious iPhone videographer's armory.
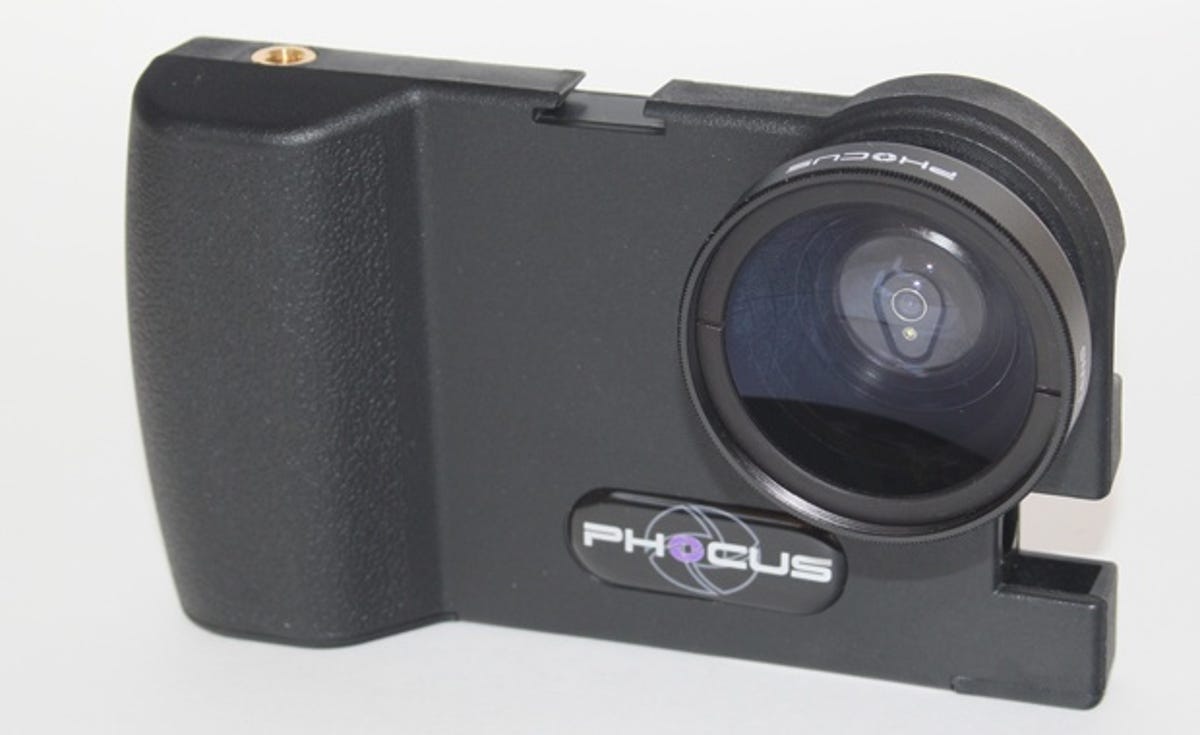
A next-generation iPhone filming rig has recently been announced. The Phocus sports many of the same credentials as the Bubo but with an ergonomically improved body.
Going handheld with a rig is OK for occasional action shots, but using a sturdy support will have an immediate impact on the overall quality of your footage. Handily, the Bubo and Phocus rigs both provide standard mounts used by most tripods and monopods.
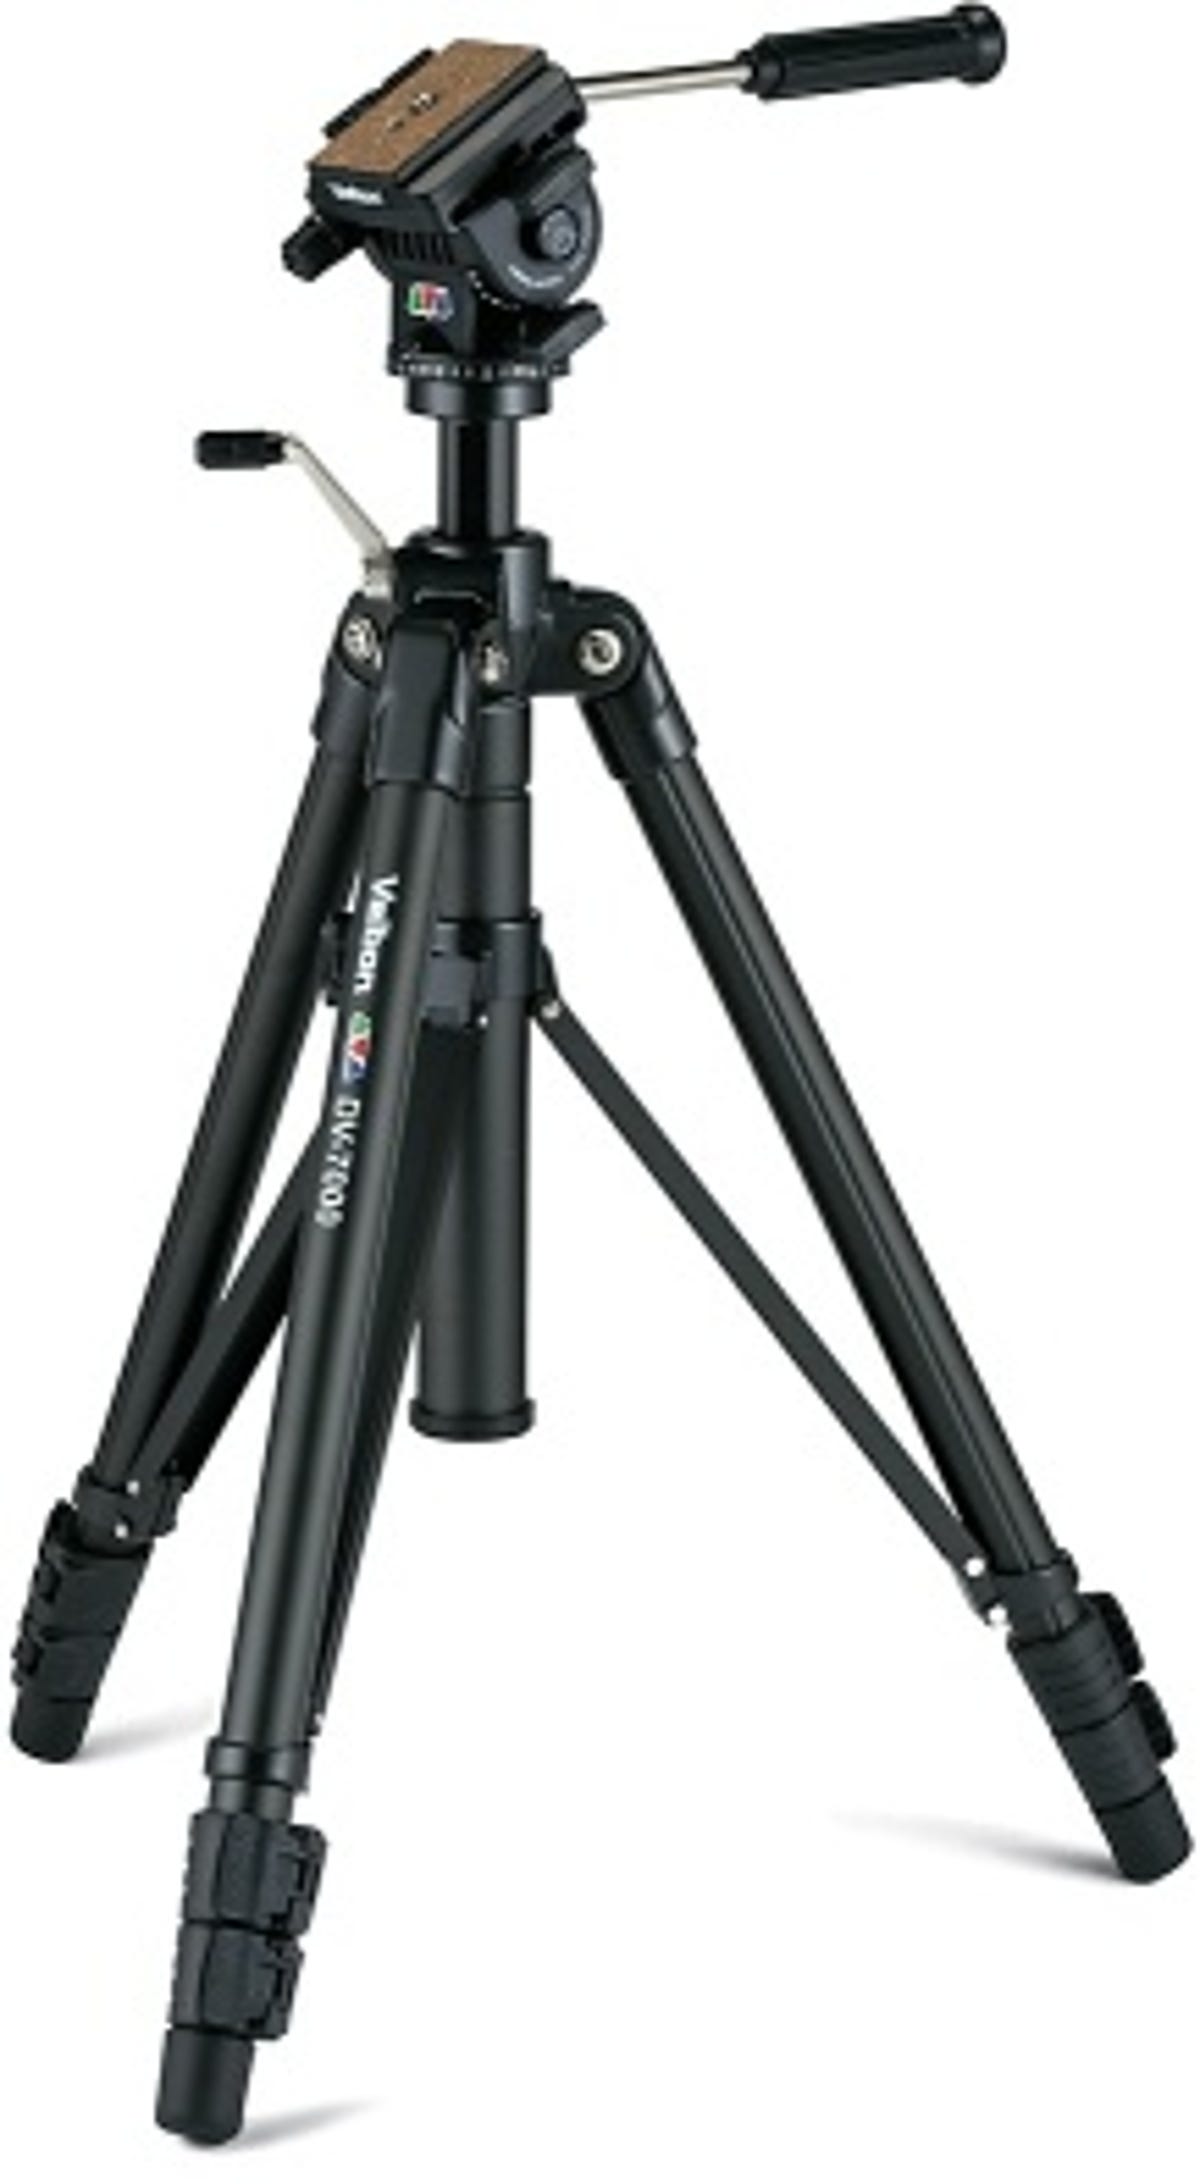
Tripods vary wildly in price and quality, but a beginner's tripod might set you back as little as $75. Opt for a tripod with a quick-release plate and also a "pan and tilt" head to achieve smooth sweeps of a scene. As an example, the Velbon DV-7000 Video Tripod is a great budget professional video tripod for a very reasonable price online.
2.2 Sound advice
An area where the iPhone can struggle is sound recording. When filming outdoors, the phone's internal microphone is easily buffeted by wind and conversations tend to be drowned out by background noise.
The omnidirectional microphone provided with the Owle Bubo is a vast improvement for recording general ambiance, but for guaranteed quality when interviewing, a dedicated handheld microphone might be best.

Fortunately, IK Multimedia has crafted the iRig Mic for exactly this purpose. Designed specially for the iPhone, its microphone employs a highly directional condenser-electret capsule (perfect for interviews), and even includes a three-position gain control switch to help with levels.
Simply plug the microphone into the iPhone (and yes, it will fit with the Bubo and Phocus rigs), and away you go. Combine this with FiLMiC Pro's on-screen sound meter and you can be confident your recording will remain audible.
Pro-tip: High-end XLR microphones can also be accommodated with an XLR-to-3.5mm jack converter or preamp, such as the iRig PRE, also from IK Multimedia).
3. Filming tips
Of course, making engaging video is not all about the technology. While it's satisfying to make footage look great with clever camera work and coloring, telling the story should be of paramount importance.
Pro tips
- When filming any story, think of a beginning, middle, and end.
- If possible, research your location and plan your shots in advance.
- Start small: practice making short, minute-long films to tell a simple story well -- making a cup of tea, walking the dog, ironing a shirt. Most longer films are made of short scenes like these.
- Understand conventions: watch television critically to observe patterns. How long are most shots (usually only a few seconds?); how are people framed (head-room, nose-room?); and how much of the filming is handheld or tripod-mounted?
- Understand the rules and then experiment!
Originally published as How to make HD movies on your iPhone 4 or 4S on CNET UK.