Create a giant screen for under $100
CNET's Donald Bell shows you how he created a giant, collapsible projection screen for under $100.


For the past five years I have been patiently waiting for the day when my son is mature enough to experience "Star Wars." Well, to be completely honest, I probably started the countdown when he was still in the womb.
The timing is critical. Too soon, and Darth Vader will inspire night terrors for years to come. Too late, and one of his blabbermouth friends at school will spill the beans on Luke's paternity test.
So we're working up to it, and with any luck someday soon his tiny brain will be imprinted with the opening scene of "Episode IV" -- Vader's Imperial-class Star Destroyer dwarfing Captain Antilles' Tantive IV and its precious cargo.
Until then, I am preparing for the day. I have the CGI-free, Han shoots first, de-specialized editions of IV-VI (seek and ye shall find). I have a sound system capable of inducing the appropriate cheek-clench as the AT-ATs plod their way across the surface of Hoth. And to capture the gorgeous cinematic scale of these films, I've been able to get my hands on a good home theater projector.
The final piece of this puzzle is the projection screen. And for the well-heeled geek dad, there are a number of cinema-quality projection screens that will make every pixel of "Star Wars" sing. For the rest of us, however, there's a sorry number of adequate screen options -- especially if the goal is to go big.
There are countless tutorials out there on how to make a projection screen using plywood and blackout cloth, or by covering a wall with a special formulation of reflective paint -- but I wanted to try something different.
The goal was to make something big enough to fill a wall, yet compact enough that it could be broken down and stored in a closet most of the year, making only occasional appearances for movie nights. And above all else, it needed to be inexpensive enough to make it worthwhile doing it myself instead of paying for an off-the-shelf screen.
After hearing an early episode of the Tested podcast, I heard Adam Savage (of "Mythbusters" fame) mention offhand that he had seen pearlized spandex used as a surprisingly good and inexpensive projection screen material. After doing some research, I found a company online (Rose Brand) that not only sold this specialized fabric, but also confirmed its virtues as a projection medium. At this point, I was really curious to try it.
But unless I planned on tacking the fabric up on the wall with some pushpins, I needed to devise some sort of frame to stretch it over. For that -- thinking again of price and portability -- I went with PVC pipe.
Mind you, I ordered everything for this project from the comfort of my cubicle, so I'm willing to bet that all the ingredients here could be acquired for less. This is especially true for the PVC piping. Instead of making a trip to Home Depot and spending a few hours hacksawing inexpensive PVC pipes to an ideal size, I ordered furniture-grade, precut pipes and connectors from an online supplier called Formufit.
For my PVC pipe frame, I let the dimensions of the cloth dictate the length and number of pipes and connectors I would need. The 122-inch width of the cloth comes out to just over 10 feet. Two yards of it, in theory, worked out to a 6-foot height. So, using lengths of 5-foot PVC pipe, I ordered enough pipe and connectors to create a basic 10x5-foot frame, with a support bar in the middle to keep it from bowing.
As I'll explain later, this concept turned out to be half-baked -- but it was a good start. To my feeble mind, it seemed that I could just make a sturdy frame, stretch the fabric over it, and then fasten down the corners using binder clips or bed sheet bungee cords.
In reality, given the stretchy nature of the spandex, I had much more fabric than I needed. I could basically fold the fabric in half and still cover the entire 10x5 frame.
I use the term "cover" loosely, though, since my idea of draping the fabric over the frame and clipping it together at the corners turned out to be a total mess. The cloth bunched up, it was a joke trying to wrangle it all, and the clips quickly came loose.
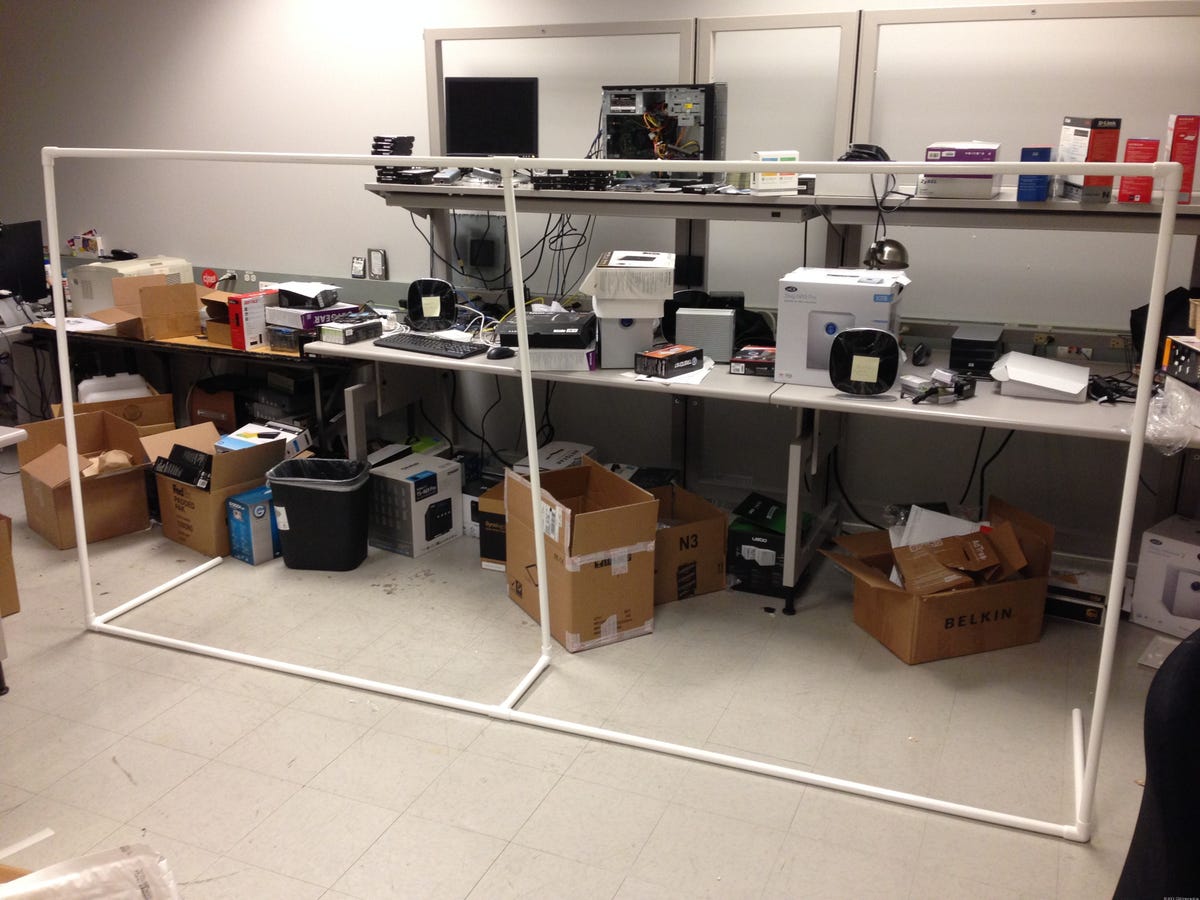
This was also the point where I realized that the frame really needed to be self-supporting. Trying to set this up by holding up the frame and the cloth simultaneously was hilarious for everyone but me. Not to mention the fact that the frame was so large that it tended to twist under its own weight, resulting in both a warped screen and wavy pockets in the fabric.

To make the situation even more complicated, I noticed that the support pipe running up the middle of the frame cast a shadow straight down the middle of the screen. Looking for an easy fix, I tried painting this white pipe with flat black spray paint to minimize reflections, but it didn't do much to solve the problem.
Undeterred, I started work on version 2.0. First, to make the frame sturdier and more self supporting, I ordered smaller lengths of PVC pipe that I could attach to the bottom corners and angle back, like feet. I also ordered a few extra connectors to accommodate these feet, as well as a small length of pipe and a connector to allow me to pull the middle support pipe back so that it would no longer lie flush against the screen and create a shadow behind the semi-opaque fabric. I didn't know if it would work, but it was worth a shot.
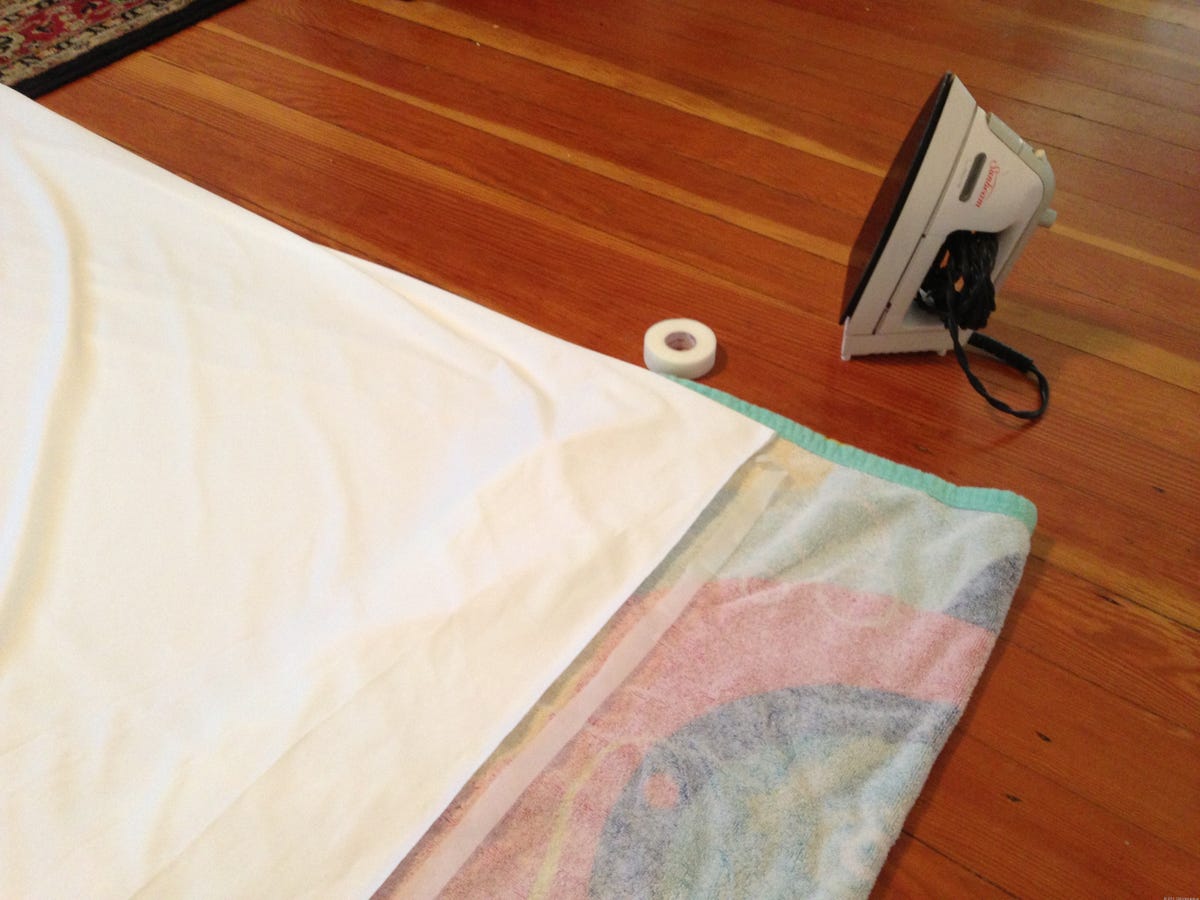
As to how best to stretch the fabric over the frame, I decided to embrace the excess fabric as a blessing. By folding it in half and stitching the sides to turn the fabric into a giant pocket, I could toss the whole thing on the frame like big beanie. A uniform stitch on each side would also eliminate the bunching of the fabric, and create a smooth tension across the whole screen, at least in theory.
Problem is, I don't know how to sew and I wasn't going to start with $50 worth of spandex. So instead I used a roll of iron-on adhesive fabric tape, carefully applied down the seam one side at a time. I wasn't confident that it would hold, which was especially distressing after the 20 to 30 minutes I had spent on the floor pressing the seams between a hot iron and a bath towel. But to my surprise the stuff actually held pretty well. The adhesive came loose in a few places during testing later on, but not with disastrous consequences, and it was nothing that couldn't be easily addressed with more adhesive.
So, with my giant spandex sheath all finished and turned inside out to hide the seams, and my new and improved self-standing frame put together, I pulled the fabric over the frame, flipped on my projector, and turned off the lights. The result, in my humble opinion, was good enough to warrant a little pat on the back.
Is it a perfect screen? Not even close. For all the advantages the spandex has in terms of price, size, and flexibility, I noticed there is a diffused glow to the way it reflects light. It's actually kinda pretty and ethereal, but it's something videophiles would likely find irritating. Perhaps a different fabric would produce a better result.
Also, because the design of the screen sits on the floor, you have to get a little creative with seating so that your body doesn't block the projection. If the projector is also on the floor, it's best to be behind it or flanking it on either side. Mounting the projector up high is ideal, but given the impromptu nature of this screen, unlikely.
That said, there's a lot to love about this solution. Setup and breakdown take just minutes. The parts can be stored in a closet as easily as a golf bag. Speakers can be set up behind the screen without blocking the sound. And best of all: the screen is huge! I imagine you could make one twice as large by doubling the ingredients.
Speaking of which, here's the breakdown of all the materials required for the project.
Bill of materials:
-2 yards of white Rose Brand Tendo spandex (122" width), $50.30
-six 5-foot PVC pipes (3/4-inch), $25.20
-four 90-degree PVC joints, $4
-two T-connector PVC joints, $2
-one slip-T PVC joint, $1.40
-two 1-foot PVC pipes, $2
-two 2-foot PVC pipes, $3.60
-two three-way PVC joints, $3.20
-fabric adhesive (Stitch Witchery) $5
Grand total= $96.70
Be sure to check out my video walkthrough of the whole project on CNET, where we also have a list of our top-rated home theater projectors. To give me grief on my rickety projection screen, or to flog me for a blog post that is more story than instruction, you can find me on Twitter.
...and may the Force be with you.